How to Make a Fast Pinewood Derby Car

Packs nationwide are gearing up for their annual Pinewood Derby. There are a variety of ways to make your Pinewood Derby car go faster. Explore the following tips to optimize your car’s performance and gain a competitive edge in an upcoming race.
BASIC GUIDELINES FOR PINEWOOD DERBY CAR DESIGN
The possibilities are endless when it comes to picking a shape for your Pinewood Derby car. Before you begin, consider the following general guidelines:
Avoid Pointed Noses: A pointed nose will make it difficult for your Pinewood Derby car to rest on the pin at the starting gate. It may also cause your Pinewood Derby car to get bumped around when the pin drops, and it can create problems for electronic timing systems at the finish line.
Weight Distribution: Leave ample wood in the rear of the Pinewood Derby car so you can place additional weight there. Concentrate the majority of the weight in the rear for optimal performance.
Maximum Weight: Aim for the maximum allowable weight, typically limited to 5 ounces in most races. If your car falls short of this weight, strategically add coins or other weights to meet the requirement.
Clarity in Orientation: Clearly distinguish the front and back of your Pinewood Derby car. In many races, the race officials — not you — will actually place each Pinewood Derby car on the track. Sometimes the officials put the Pinewood Derby car on the track backward because they can’t tell which end is which.
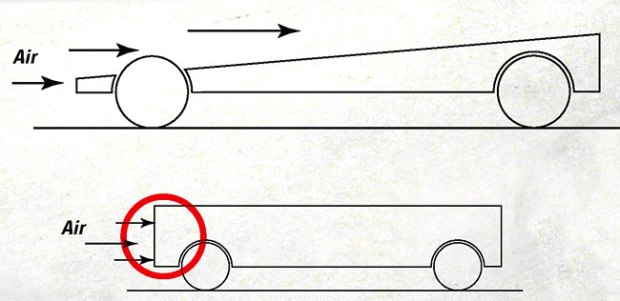
Aerodynamic Design: Select a design that facilitates smooth airflow over and around the Pinewood Derby car body. Pinewood Derby cars with aerodynamic profiles go faster.
See photo galleries of hundreds of Pinewood Derby car designs.

10 STEPS FOR DESIGNING AND BUILDING YOUR PINEWOOD DERBY CAR
You don’t have to strive for the fastest Pinewood Derby car to have fun competing in your Pinewood Derby. But if you and a helpful adult are willing to put in the extra time and effort, these tips are for you.
1. Bake the Block: Start your Pinewood Derby car project by baking the wood block at 250 degrees for two hours. This removes moisture and lightens the block, allowing you to place more weight at the rear of the car where you actually want it.

2. Crafting the Design: Outline your Pinewood Derby car on paper, cut it out, and affix it to the wood block.
Remember, a rectangular car is not an aerodynamic design. The most basic aerodynamic design is a simple wedge. If you don’t have time to design a complex car, a wedge will work just fine.
Download a Pinewood Derby car template PDF to help you create your design.
3. Rough Cut the Design: Use a coping saw or enlist the help of a responsible adult with a power tool to cut out the rough shape of your Pinewood Derby car.
4. Shape Your Car: Smooth edges and shape your car using sandpaper. An adult can assist with a rotary tool or other shaping tools.
5. Sand and Paint Creatively: Reduce friction by smoothing the car’s surface and paint an awesome design to make it look great.
How to paint your Pinewood Derby car to give it a shiny finish.
6. Axles and Wheels Alignment: Make sure they are aligned perfectly straight. You can test the alignment of your axles by pushing your car across a smooth floor or table. It should roll smoothly in a straight line.
— Consider a Three-Wheeler: Raise one wheel about 1/16 inch higher so it never actually touches the track. Less friction = more speed. Rules vary from pack to pack, so make sure to check your pack’s Pinewood Derby rules to make sure three wheelers are allowed in your race.
— Extend the Wheelbase: Maximize the distance between front and rear wheels. Again, make sure this is allowed in your race.
Learn about polishing Pinewood Derby axles and wheels to reduce friction.
7. Secure Axles with Glue: Glue the axles firmly in their holes to ensure that they stay perfectly placed, but make sure you don’t get glue on your wheels.
8. Strategic Weight Addition: Remember to make your Pinewood Derby car as heavy as the rules allow. In general, it’s best to place weight to the rear of your car because a heavier rear increases speed.
Learn scientific Pinewood Derby speed tips from a former NASA engineer.
9. Use Graphite: Add graphite or another dry lubricant to reduce friction. The less friction between the body and wheel, the better.
10. Have fun! And finally, remember the most important rule of a Pinewood Derby is that it’s supposed to be fun. While you should always strive to do your best, don’t get caught up in winning or having the fastest car. Just enjoy the ride.
Adapted from the book “Pinewood Derby Speed Secrets,” DK Publishing, $12.95 softcover.
I make it on a piece of paper first
I’m going to make a tear drop shaped car with three wheels, but should I put the two wheels on the front or the back?
I’m making a f1 race car!!!!!!!!!!!!!!!!!!!!
I once got 4th place
I once got first
I Ditto!
AWESOME!!!
Somebody cheated last year in my pack !!!!!!!!!!
Good advice. Clamping the axles in a drill press makes it easier. I use 400 grip sand paper to polish the axles after I use a small very fine file to remove the clamp marks near the head.
hey yeah right I helped with as much as I could did you think my dad let me use his electric saw
Great advice thanks 😉
I didn’t know that you shouldn’t point the nose, know about the three wheel trick, or that coins work as weights.
The best thing about derby cars is keeping them to show your kids some day. Winning only means having to go somewhere else and spend another night standing around a racetrack.
How do you make a pine wood derby car fast
nice advice.
just about to do a derby race
I learned last year when the boys’ cars were too light that pennies work as last minute weights.(It looked cute too since their themes on the cars were pirate ships.)
The reason the “three wheel trick” works (assuming your car still goes straight etc) is that one less wheel is using up potential energy being converted to rotational energy, which leaves more potential energy for kinetic (speed) energy.
The three wheel thing is not allowed in our pack. All wheels have to touch. Also, there are rules about how far apart the wheel bases can be. Make sure you check your pack’s rules.
The only kids that win are the ones who have a parent that spends endless hours engineering the car just right. There are no rules or governance involved with the process. It’s basically teaching kids how to cheat by having a parent do all the work. I refuse so my kid loses every year. Boy scouts is outdated and horribly organized.
I agree. I give limited help, for my child is too young to wield power tools and saws in 2nd grad.
I will only cut the design. The boys do the rest of the work. I feel there needs to be a rule about best in show being limited to “work done by boys only, except design cut”
C,mon guy. Do you really expect a tiger to know how to smooth axels and use power drills?
I totally agree with three year champ
that is so not true!
YEP
How did they get the shark fin too be that tall?Isn’t there a height rule?
Additional wood can be used to add height. Most districts don’t have a height regulation, just width for the track and weight
Buckethead,
You may be right about height restrictions if your Pack or District uses electronic timing devices. It is always a good idea to ask first about size limits before adding anything that might increase the overall size of the basic block in a pinewood derby kit.
I’m a eagle scout and i used the body style of a nascar and put the weights on the bottom of the car and I’ve won first over 6 years know
I had better success putting the weight in the front, kinda did the same as the 3 wheeler, it took so much weight off the rear that the friction wasn’t as much of a factor. Also see if you can get a tire dealer to donate stick on wheel weights. They come in 1/4 ounce segments, Would love to cut the thickness of the front wheels down, but I was warned ….
I really hope these speed tricks work because last year I forgot my car and had to use a batman car and got last place and I’m not forgetting my car this year.
That didn’t really help me. 😐
I got a perfect design for my pinewood derby car
Thanks for the info
I know the secrets before 🙂
Put weights on car
small wheels on front or back?
three wheel + the wedge = FAST
Make sure you know your local rules. We moved the wheels back and won our first year. The 6 year reigning champ did not like it so his “committee” made sure that altering the wheel base was not allowed…without telling anyone else so the next year we were DQ’d. Won for best paint job however!
I am not sure I understand our council does not allow this:
Extend the Wheelbase: The front and rear wheels should be as far apart as possible.
How is it listed here?
Wrong about the 3 wheels being less friction. I’m surprised that got published, it’s a myth. The friction is just transferred to the other wheels. But you do get more rotational energy and thus a faster car.
Wrong, less contact equals less friction so it does get reduced. Weight distribution gets spread out but not friction.
Sorry, but I think speedthree has it right. Friction is a function of the coefficient of friction, and the normal force between the surfaces. The surface area does not factor. However, the wheels have a rotational inertia that needs to be overcome, so having one less wheel to force to rotate will result in increaded acceleration.
The “Avoid designs with a pointed nose” guideline directly contradicts a different BSA publication. That tells you to make a narrow area in the center of the car (nearly pointed) so that the race starter has to “work” to get the car placed in the center of the track, so that the wheels are touching the sides of the track.
I saw one car with a notch in the front where the starting pin rested. The result was the body of the car being a bit ahead of all the others. It wasn’t against the pack’s rules, and the car didn’t win anyway…but it was sort of clever.
what happens if i bake it after cutting it?
baking it will reduce your un-weighted mass so you can better place weight where you want it. doing so after cutting risks warping the car body. bake before cutting, especially with thin or flat shapes.
Those must have been made by the pros
which wheel should I lift, the front or the rear?
rear wheels
One thought- since its better to raise a rear wheel on a 3 wheeler, how does that theory work with the other “go-to” of placing weight at the rear? I would think there would be tendency for the opposite front wheel to pull up off the track.
Usually a front wheel, since you’re placing the weight in the back, it could wobble back and forth if you lift a rear wheel.
Always raise one of the front wheels
Raise a front wheel and use dry graphite. I would smoke everyone, every year. Also, take fine grit sand paper and the inside of the nail head, there are usually small burs and imperfections that add friction.
Raising a back wheel would be disastrous. You only want one wheel fighting for direction, as it will limit the time the inside track bangs the wheels. Lifting a rear wheel wouldn’t solve it the same way.
nice
It would be nice if there was a official rule book and measuring box.
awesome!!! trying it out now
In certain races, there are.
Great info… but a good piece of pine wood, round wheels, and straight axles never hurt either… have fun
yeah in my pack you have to use the given wheels
Your pack committee should establish an adult race. This lets the dads satisfy their personal competitive urges and lets the boys be boys. I always won with a simple wedge and the three wheel trick.
yea, i usually make a wedge, always three-wheeled and axles sanded with at least 6-8 different sandpapers, each a different roughness. what really helps is cutting the sides off about 1/8 inch everywhere except where the wheel and axle are. this prevents the wheel from ever rubbing against the car, significantly reducing friction.
In my pack, we’re doing that this year.
Cool! But how the heck do you make that shark fin car? It looks awesome!
My son’s shark fin car won first place in design and third in speed! I just purchased a $2.00 design template on-line.
awsome
where do you put the gas on the wheels
My first car always got last,and my second car got 2 and 1. My last car got 3 and 4 and 2. Awesome!!!!!
Awesome! I’m a Boy Scout and you should put the weights on the bottom of the car
this is going to help so much
it is ok.
Thx but I have the book
Back when I was a cub scout, I got 4th, then 3rd, and then 2nd (against everyone) the three years I raced. I used the three wheel trick.
Nice!!
WOW!!!!!!!!
only if there were a ruler!!!!!!!!!!!!!!!