C Sharp (C#)
C# (pronounced C-Sharp) is a general purpose object oriented programming language developed by Microsoft for the Windows platform. It uses the .NET platform, which is a fancy way of saying that a lot of the work has been done for you — you just write a program that takes advantage of all the code that has already been written.
Download software: https://visualstudio.microsoft.com/
Cost: Free
Instructions to setup software: Run SETUP program
TRY IT!
1. Open Visual Studio Express for Windows Phone.
2. From the start page click on New Project.
3. Select Windows Phone App, and enter ‘CSharpDemo’ in the Name and Solution Name boxes.
4. Click on ‘OK’ to create the project.
5. Replace the code in the MainPage.xaml window with this code:
<phone:PhoneApplicationPage
x:Class="Programming_MB_Demo.MainPage"
xmlns="http://schemas.microsoft.com/winfx/2006/xaml/presentation"
xmlns:x="http://schemas.microsoft.com/winfx/2006/xaml"
xmlns:phone="clr-namespace:Microsoft.Phone.Controls;assembly=Microsoft.Phone"
xmlns:shell="clr-namespace:Microsoft.Phone.Shell;assembly=Microsoft.Phone"
xmlns:d="http://schemas.microsoft.com/expression/blend/2008"
xmlns:mc="http://schemas.openxmlformats.org/markup-compatibility/2006"
mc:Ignorable="d"
FontFamily="{StaticResource PhoneFontFamilyNormal}"
FontSize="{StaticResource PhoneFontSizeNormal}";
Foreground="{StaticResource PhoneForegroundBrush}"
SupportedOrientations="Portrait" Orientation="Portrait"
shell:SystemTray.IsVisible="True">
<!--LayoutRoot is the root grid where all page content is placed-->
<Grid x:Name="LayoutRoot" Background="Transparent">
<Grid.RowDefinitions>
<RowDefinition Height="Auto"/>
<RowDefinition Height="*"/>
</Grid.RowDefinitions>
<!-- LOCALIZATION NOTE:
To localize the displayed strings copy their values to appropriately named
keys in the app's neutral language resource file (AppResources.resx) then
replace the hard-coded text value between the attributes' quotation marks
with the binding clause whose path points to that string name.
For example:
Text="{Binding Path=LocalizedResources.ApplicationTitle, Source={StaticResource LocalizedStrings}}"
This binding points to the template's string resource named "ApplicationTitle".
Adding supported languages in the Project Properties tab will create a
new resx file per language that can carry the translated values of your
UI strings. The binding in these examples will cause the value of the
attributes to be drawn from the .resx file that matches the
CurrentUICulture of the app at run time.
-->
<!--TitlePanel contains the name of the application and page title-->
<StackPanel x:Name="TitlePanel" Grid.Row="0" Margin="12,17,0,28">
<TextBlock Text="Programming MB" Style="{StaticResource PhoneTextNormalStyle}" Margin="12,0"/>
<TextBlock Text="Temperature Conversion" Margin="9,-7,0,0" Style="{StaticResource PhoneTextTitle1Style}" FontSize="36"/>
</StackPanel>
<!--ContentPanel - place additional content here-->
<Grid x:Name="ContentPanel" Grid.Row="1" Margin="24,10,0,-10">
<TextBox x:Name="TextBox1" HorizontalAlignment="Left" Height="71" Margin="121,202,0,0" TextWrapping="Wrap" VerticalAlignment="Top&" Width="186"/>
<TextBlock x:Name="Text1" HorizontalAlignment="Center" Margin="90,44,73,0" TextWrapping="Wrap" Text="Convert temperatures from Degrees Fahrenheit to Celsius " VerticalAlignment="Top" Height="105" Width="293" FontSize="24"/>
<TextBlock x:Name="Text2" HorizontalAlignment="Left" Height="26" Margin="51,176,0,0" TextWrapping="Wrap" Text="Enter Fahrenheit Temperature here" VerticalAlignment="Top" Width="332"/>
<Button Content="Convert" HorizontalAlignment="Left" Margin="51,293,0,0" VerticalAlignment="Top" Click="Button_Click_1"/>
<Button Content="Reset" HorizontalAlignment="Left" Margin="275,293,0,0" VerticalAlignment="Top" Width="131" Height="72" Click="Button_Click_2"/>
<TextBlock x:Name="Text4" HorizontalAlignment="Left" Margin="66,401,0,0" TextWrapping="Wrap" Text="It is " VerticalAlignment="Top" Height="40" Width="50" FontSize="24" RenderTransformOrigin="-0.928,0.503" Visibility="Collapsed"/>
<TextBlock x:Name="Text5" HorizontalAlignment="Left" Margin="121,401,0,0" TextWrapping="Wrap" VerticalAlignment="Top" Height="40" Width="113" FontSize="24">
<TextBlock x:Name="Text5B" HorizontalAlignment="Left" Margin="239,401,0,0" TextWrapping="Wrap" Text="Celsius Outside " VerticalAlignment="Top" Height="40" Width="167" FontSize"24" Visibility="Collapsed"/>
<TextBlock x:Name="Text6" HorizontalAlignment="Left" Margin="66,466,0,0" TextWrapping="Wrap" VerticalAlignment="Top" Height="99" Width="340" FontSize="24"/>
</Grid>
<!--Uncomment to see an alignment grid to help ensure your controls are
aligned on common boundaries. The image has a top margin of -32px to
account for the System Tray. Set this to 0 (or remove the margin altogether)
if the System Tray is hidden.
Before shipping remove this XAML and the image itself.-->
<!--<Image Source="/Assets/AlignmentGrid.png" VerticalAlignment="Top" Height="800" Width="480" Margin="0,-32,0,0" Grid.Row="0" Grid.RowSpan="2" IsHitTestVisible="False" />-->
</Grid>
</phone:PhoneApplicationPage>
6. Click on the arrow next to MainPage.xaml in the Solution Explorer on the right side of the application. Double click on MainPage.xaml.cs to open the window for that file.
7. Copy this C Sharp code into the MainPage.xaml.cs window:
using System;
using System.Collections.Generic;
using System.Linq;
using System.Net;
using System.Windows;
using System.Windows.Controls;
using System.Windows.Navigation;
using Microsoft.Phone.Controls;
using Microsoft.Phone.Shell;
using Programming_MB_Demo.Resources;

namespace Programming_MB_Demo
{
    public partial class MainPage : PhoneApplicationPage
    {
        // Constructor
        public MainPage()
        {
            InitializeComponent();
        }

        private void Button_Click_1(object sender, RoutedEventArgs e)
        {
            double DegText, CelText;
            DegText = double.Parse(TextBox1.Text);
            CelText = (5.0 / 9.0) * (DegText - 32.0);
            Text4.Visibility = System.Windows.Visibility.Visible;
            Text5.Text = CelText.ToString();
            Text5B.Visibility = System.Windows.Visibility.Visible;
            if (DegText > 100)
            {
                Text6.Text = "It's Hot! Better Hydrate";
                Text6.Visibility = System.Windows.Visibility.Visible;
            }
            else if (DegText <= 32)
            {
                Text6.Text = "It's Cold! Better pack long underwear";
                Text6.Visibility = System.Windows.Visibility.Visible;
            }

        }

        private void Button_Click_2(object sender, RoutedEventArgs e)
        {
            TextBox1.Text = "";
            Text4.Visibility = System.Windows.Visibility.Collapsed;
            Text5B.Visibility = System.Windows.Visibility.Collapsed;
            Text5.Text = "";
            Text6.Visibility = System.Windows.Visibility.Collapsed;

        }


    }
}
8. Click on File then Save All from the program menu.
9. Click on DEBUG then Start Debugging in the program menu to test the program. Enter a temperature and click the Convert Button to see the result. Try several different temperatures.
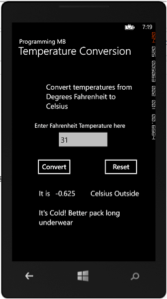
10. The program will look like this when it is running.

ABOUT THE PROGRAM — A WALK THROUGH
1. The “Button_Click_1” function
a. Obtains the value entered in the Input Textbox.
b. The value is converted to Celsius (with a single decimal place).
c. The Celsius value is evaluated with a series of IF Statements and a suggested action phrase is assigned to the variable: “Text6.Text”
d. A sentence is created by combining or “concatenating” some static text along with the temperature values (deg F and Deg C) and the action phrase.
TRY THIS
1. Change the temperatures used in the decisions – change the lower temperature from 60 to 30 degrees, for example. Save the file, restart the program, and enter new numbers – did the answers change at the new temperature?
2. Create a new temperature range from 30 to 60 degrees and have it display – “Bring hat and gloves!”
3. Change the wording of the phrases
4. Add another text input – ask for the wind speed, for example
5. Add some conditional statements that evaluate the wind chill factor
6. Add some text to display the wind chill result
LEARN MORE
http://www.homeandlearn.co.uk/csharp/csharp.html — A well organized tutorial with a lot of working examples and source code
Console.WriteLine(“C# Is the Best\n”);