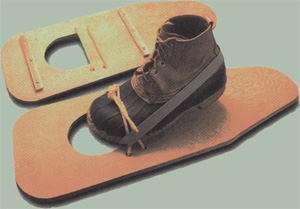
How to make sturdy wooden snowshoes
 Trekking through snow is loads of fun, until you get stuck in knee-deep drifts. That can be tiring and take the fun out of winter.
But sturdy snowshoes will keep you near the top of the snow’s surface. With an adult’s help, you can build your own pair.
WHAT YOU’LL NEED
- Two pieces of 3/8-inch-thick plywood, 24 inches long by 8 inches wide
- Four pieces of 3/8-inch-thick plywood (for the bottom cleats), 6 1/2 inches long by 3/4 inches wide
- 12 3/4-inch-long round-head wood screws
- Two 1/4-inch poly-ropes, each 42 inches long
- Two 1-inch-wide strips from a tire’s inner tube
- Ripsaw
- Coping saw
- Drill and bits
- Screwdriver
- Waterproof wood glue
- Ruler
- Circle-drawing compass and pencil
- Sandpaper
WHAT YOU’LL DO
 Step 1: Mark one end of a board TOE, the other HEEL. Four inches from the toe end and 2 inches from each side, draw the 4-inch by 4-inch opening for your boot toe. Drill starter holes A, B and C, using the 1/8-inch bit followed by the 1/4-inch bit (use two different sizes so the wood doesn’t split).
Step 2: With the compass set for a circle with a 2-inch-radius, draw the rounded corners at the toe end. Change the setting to 2 1/4 inches for the heel end, keeping the compass centered between sides.
Step 3: Draw a line across the board 9 inches from the heel end. Using the ruler, connect the 9-inch mark at the sides with the edge of the heel half circle you drew with the compass.
Step 4: With the ripsaw, cut along the tapered lines. Next, use the coping saw to round out the heel. Now round off the edges at the toe end.
Step 5: Remove the coping saw’s blade and insert it through A. Reconnect the blade to the frame. Following the rounded shape, cut from A to B. Turn the coping saw and cut as far as you can toward C. When you can’t cut any farther, place the saw back through A and cut to C. Then turn the saw and cut from C until you’ve joined B.
Step 6: Mark rope holes E, 1 inch from the side, and F, 3/4 inch from the side, 1 1/4 inches apart. Do the same for D and G. Drill the holes using a 1/8-inch bit, then follow with a 1/4-inch bit and a 3/8-inch bit.
Step 7: Draw the two cleat positions on the bottom, one 2 1/4 inches from the toe end and the other 10 inches from the heel end. Drill holes through the cleats with three screws.
Step 8: Spread waterproof glue on one side of each cleat, then position and screw in cleats. Sand all edges. A coat of marine spar varnish or outdoor paint is optional.
Step 9: Working from the top of the snowshoe, slip a poly-rope end down through D. Pull across and thread through E. Take it across the top and pull down through G. Then come across and up through F. Tie a square knot and whip or heat-seal the rope ends.
Step 10: Slip the inner tube around the ankle of your boot. Slide the boot under the knotted ropes until it fits snugly, tightening the knots if needed. Then pull the inner tube over the boot‘s toe, under the boot.
Remember, use a wider stance when walking. Otherwise, the shoes may overlap — and you may go flying. Lift your feet and keep the front ends tilted up.
Make sure you practice; a hiking staff will help keep your balance. Then trudge on — the snow won’t stop you now!
Worked good for scouts. Not so good for heavier adults.
I made similar ones in Boy scouts 42 years ago and YES!! they worked in the Northeastern storm of 1978. BTW we had about 3.5 feet of snow and they sunk only a couple inches
Worked good!
These look cool to make. And appear to be pretty easy to make as well. I just hope they actually work.
They do !!!! I made ones like them 42 years ago in Boy Scouts
these look cool