How to Build a Homemade Radio That Really Works
Radios might seem super high-tech. But with about $15 and one afternoon, you can make one at home.

Click here for a PDF version of these instructions.
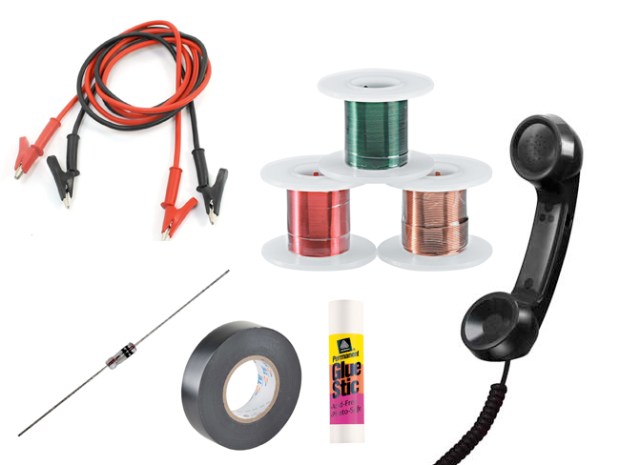
WHAT YOU’LL NEED
- Magnet wire: Electronics supply stores often sell a set, for about $10, that comes with 40 feet of 22-gauge, 75 feet of 26-gauge and 200 feet of 30-gauge magnet wire. You can also find it at Amazon.com or Radioshack.com.
- 1 set of alligator leads with clips at each end.
- 1 diode: Look for IN34A diodes, also called “germanium diodes,” at an electronics supply store or online.
- 1 glue stick or anything similar in size — about 1 inch by 1 inch by 6 inches. It can be a piece of wood. It doesn’t have to be perfectly round, but using something round is easier for winding.
- Electrical tape
- Wire stripping pliers
- Telephone handset with cord. If you don’t have an old phone that you don’t use anymore, you might be able to find one at thrift stores or garage sales.
- One board for mounting your radio — 2 feet by 2 feet will work. You can make the radio without this, but having a workspace and a place to mount the radio makes it easier to carry around while you’re looking for a place to hook the ground wire.
WHAT YOU’LL DO

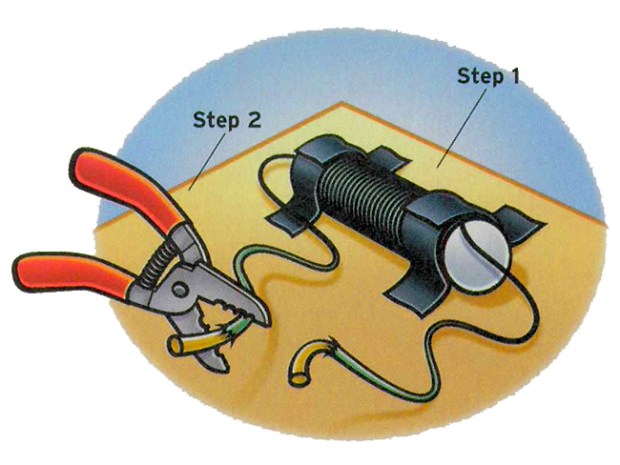
Step 1: Wind 26-gauge wire (the green magnet wire) around the glue stick until it covers nearly the entire cylinder. Keep the wire tight. Leave about six inches of wire on each end. Once you’re finished winding it, tape around both ends of the cylinder to make sure the wire holds. Then, mount the coil to the board with electrical tape.
Step 2: Strip the ends of the wire you’ve left from each end of the coil. Use wire stripping pliers or sandpaper. The wire is very thin. Removing the enamel and exposing about one inch of the wire should be easy.

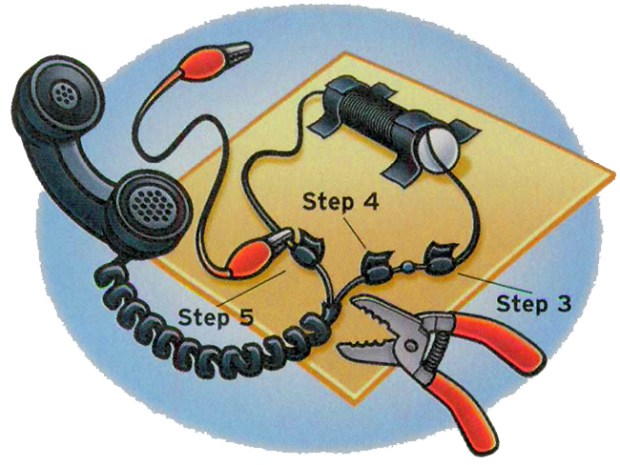
Step 3: Attach the wire from the right side of the coil to one end of your diode. Tape the connection.
Step 4: Cut the end of the phone cord and strip about two inches of it. It should expose two wires. Strip those wires. Take your time; this wire is thin. (Try this tip: Before hooking up the tiny telephone cord wires, get some thicker insulated magnet wire and tape about two inches to each wire. This will make the rest of the job easier.) Attach one end of the wire to the exposed end of the diode. Tape that connection.
If your phone cord has four wires instead of two, you have to figure out which two will work. Take a 9-volt battery and place one cord against the positive (+) pole of the battery and another cord on the negative (-). When you find a combination that makes a clicking sound in the headset, you have found the two wires to use.
Step 5: Connect the second telephone wire to the green wire coming from the left side of the coil. Before taping this connection, clip one of the alligator leads to it. Tape those three wires together — the alligator lead (that’s your ground wire), the telephone wire and the wire coming from the left side of the coil.

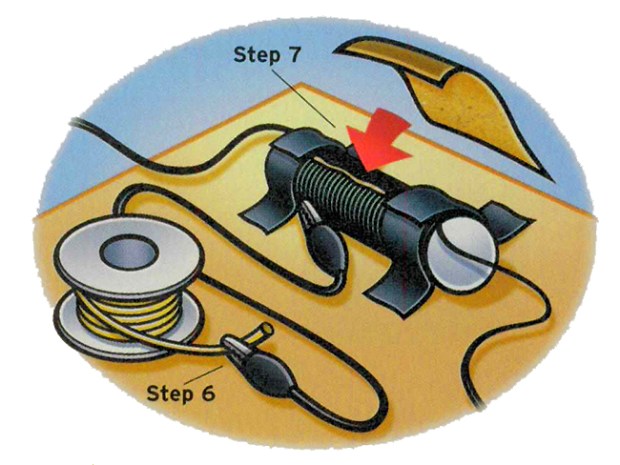
Step 6: Make your antenna by clipping one of the remaining alligator lead wires to one end of the 22-gauge magnet wire. Leave this wire on its roll.
Step 7: Scrape a thin strip of enamel from the wire wrapped around the glue stick. You can do this with any sharp object or a piece of sandpaper.
SEE IF IT WORKS
Attach your telephone cord to its handset.
Find a good ground for the alligator wire that’s connected to the left side of your coil. A pipe going into the ground is perfect.
Unroll the antenna wire and hang it over a tree branch with help from an adult.
Touch the alligator clip that leads to your antenna wire to the top of the coil. You should be able to hear an AM radio signal.
TROUBLESHOOTING
If you can’t get any signal, it’s probably your ground wire. With permission from an adult, unscrew one bolt that holds the faceplate to a light switch or outlet. Unscrew it just enough to hook your alligator clip. Don’t remove the plate.
If you get a weak signal, it’s your antenna. If your parents have an old television antenna, hook your radio antenna wire to one of the connections on the TV antenna wire instead of running wire up a tree.
PHOTOS OF COMPLETED PROJECT
Check out these photos of the completed project sent to us by Scout Life readers. If you have a photos of a SL Workshop project, please use the form below to send them to us.


how do you get fm stations
I can’t get mine to work. I have looked over the instructions a million times and can figure out what I did wrong. I have the exact same materials as the instructions, and my wires are all connected to the right spot. I live on a farm, but I don’t think I am too far away to receive radio waves. I hear a noise in the headset, but no radio stations. Please Help Me!!!!!!!!!
it realy works thats awsesome!!!
THAT LOOKS COOL
THAT IS AWSOME! I’m going to try it!
I wonder if you can shirnk it and put it in a kart? Also, if you can get a sattlite dish(sorry, bad grammer) theat would be cool!!
cool, It sounds cool I’ll try it
Cool
This radio receiver that is built using a glue stick and some 26 guage wire and 22 gauge wire is a great school science fair project and also good for a merit badge. Does this radio receiver only receive one frequency of radio broadcasts or will it receive multiple frequencies when adding a metal paper clip radio tuner that comes into contact with the 26 guage wire? It’s great to listen to radio broadcasts with this type of receiver who announce their Federal Communications Commission Letter Identifications who broadcast over a specified geographical area in accordance to any particular FCC radio broadcast license grade (such as grade A,B, C, and so forth). Sometimes the radio broadcasts received on this radio will announce that the radio station is either W,_,_,_, or K,_,_,_. Thanks for a great school science fair project idea.
added note…when the call letters of a radio station start with the letter W that means the station is East of the Mississippi River. If it starts with K then the station is west of the Mississippi River.
cool and not very expensive, realy works too!!!, but i havent had time to do it…YET.