How to Build and Fly a Box Kite
Box kites are known for their high lift. In fact, most of the altitude records for kite flying are held by large box kites. You can make this box kite with easy-to-find materials from your hardware or craft store. Lightweight materials will help it soar, even in a mild breeze.

WHAT YOU’LL NEED TO MAKE A BOX KITE
- Pocketknife
- Pencil
- Scissors
- Fine-toothed saw
- 4 wooden dowels 1⁄4” x 36”
- 4 wooden dowels 1⁄4” x 17”
- 4 straws that can slide over 1⁄4” dowels
- Household string
- Carpenter’s glue
- Duct or masking tape
- Lightweight construction paper (You can also use 2 mil painter’s plastic cloth, newspapers, wrapping paper or plastic trash bags.) You will need two sheets of material 11” x 64”.
- Kite string
WHAT YOU’LL DO TO MAKE A BOX KITE
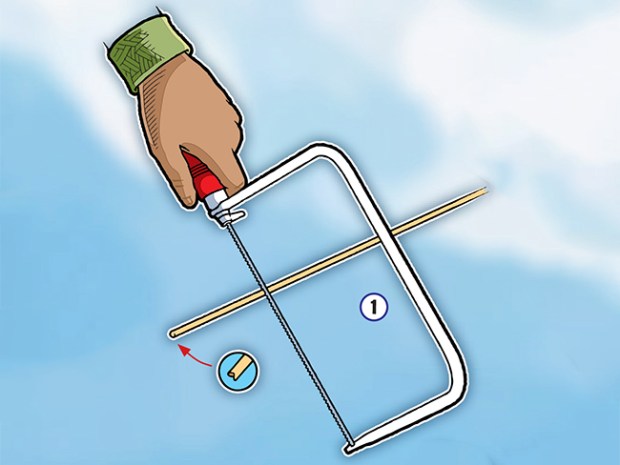
1. Cut the 1⁄4” dowels to length. Use your pocketknife to carve a notch in each end of the 17” dowels. Notches at opposite ends of each dowel must be at the same angle to fit into the dowels they will cross.
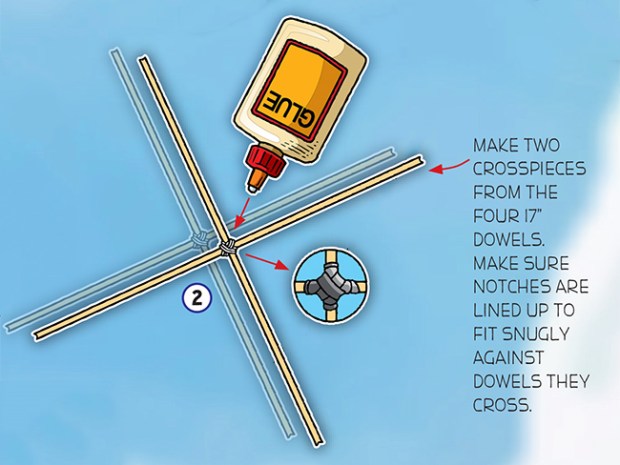
2. Mark each 17” dowel halfway along its length at 8 1⁄2”. Turn notches in correct direction and tie two tightly together at the halfway point with household string. Soak the string with glue. After the glue dries, wrap the joints tightly with masking or duct tape. Make two of these crosspieces, which will hold the frame together.
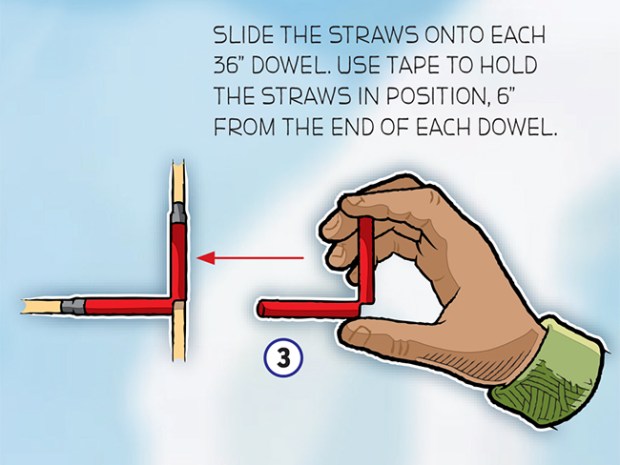
3. Cut eight lengths of straw 4” long. Cut and fold each straw as shown. Slide the straws onto each 36” dowel. Use tape to hold the straws in position, 6” from the end of each dowel. Make sure both straws on each dowel are pointing in the same direction. Slide the crosspieces into the straws. Use tape to hold the whole thing together while you tie the joints tightly together with string, soak with glue and tape as in Step 2. This process will make a very sturdy frame for your kite. As an option, you can wrap a string around each end of the frame to add strength.
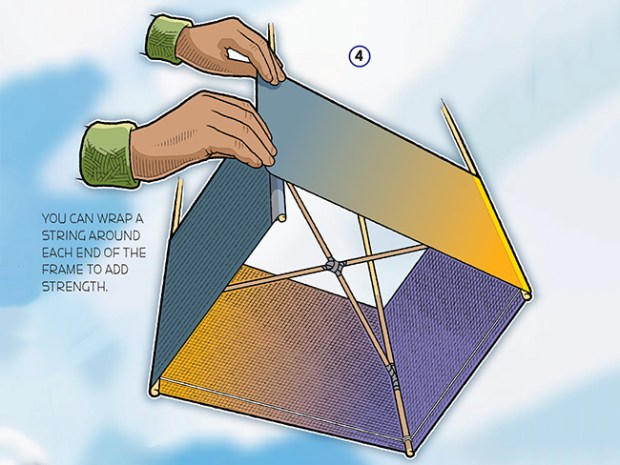
4. Tape and tightly wrap the 11” x 64” sheet material around the frame. Trim to length and tape in place.
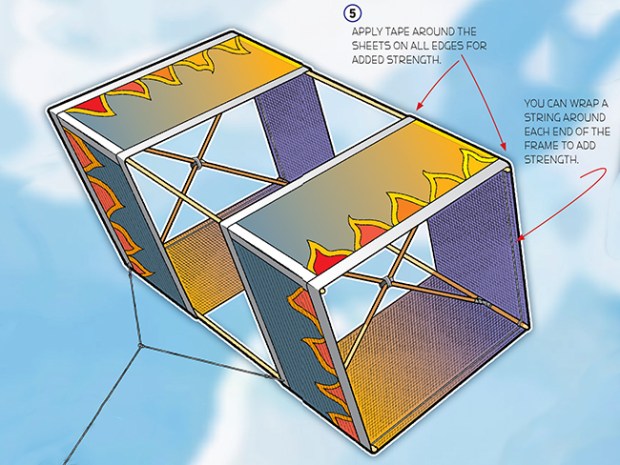
5. Apply tape around the sheets on all edges.
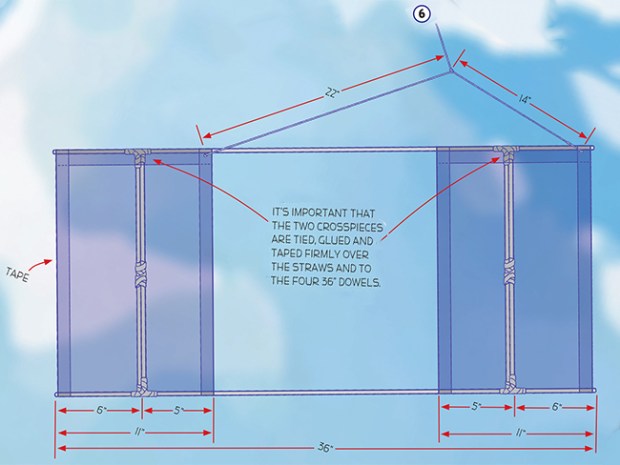
6. Attach the kite string as shown, and you’re ready to fly.
PHOTOS OF COMPLETED PROJECT
Check out these photos of the completed project sent to us by Boys’ Life readers. If you have a photos of a BL Workshop project, please use the form below to send them to us.


I like turtles
It flew beautifully. I tried using bin liner but used wide clear tape overlapping round and round. It was probably the ugliest kite ever.
i love hot wings
Photo No This.
I have built several box kites.
They all have flown.
I thought I had wasted my time too, but its the wind speed.
Mine won’t fly either. I used a whole box of 16 penny nails putting it together and it’s too heavy. Next time I’ll try duct tape. Oh, wait…..
At age 64 built and flew my first box kite as per your plans, it flew well.
I attached 36″ bridle to dowel just below top paper and at base of lower paper,then attached kite string about 12″ from top of bridle. thanks!
where is string attached ?
i need help
i need help
The instructions are not crystal clear as to where the string is attached to the kite.
My group and I built this kite for school. It was are final and it wont fly what do we do???
They are so clear as to where the kite string attaches you can’t miss it,go back and look until it becomes clear to you and if you don’t see it go back look again.
it seems ok