Make a suit of chain-mail armor
 Two leather-clad warriors face each other, swords drawn. Suddenly one of the warriors attacks, his swinging sword clanging loudly against the defending warrior’s. Back and forth they cut and parry, the meadow ringing from impacts. Suddenly the attacker sees an opening and takes a swing he knows will surely cut his opponent in two. His sword slices through his enemy’s leather clothing—but strikes metal instead of flesh! Stunned but far from dead, the attacked warrior says a silent prayer of thanks to the armorer who had saved his life by making him a coat of chain mail.
The Scouts in BSA Troop 324 at European Command Headquarters in Stuttgart, Germany, don’t plan on being in any sword fights. But making their own suit of chain-mail armor can transport them to the days of shining knights, if only for one fun afternoon. Here’s how you can join them.
You’ll Need:
• two 500-foot rolls of 14-gauge copper wire
• electric drill with 3⁄4-inch bit and 1⁄8-inch bit
• wire cutters
• hammer and nails (long enough to secure wood together)
• wood saw
• wood glue
• 3-foot-long wooden dowel, 3⁄4-inch in diameter
• 7 feet of lumber
• adult’s help and/or permission
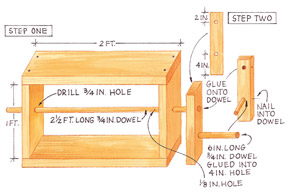 STEP ONE: Build a Wooden Rack
A rack or frame will make it easier to produce the many rings needed in a shirt of chain mail.
1. Cut the lumber into three 1-foot-long pieces and two 2-foot-long pieces. Set one 1-foot piece aside.
2. Through the center of two 1-foot pieces, drill a 3⁄4-inch hole. Move the drill bit around to make the holes slightly larger, so the 3⁄4-inch dowel easily slides through.
3. Build the rectangular rack with the two 2-foot pieces and two 1-foot pieces with holes.
4. Slide the dowel through both holes.
STEP TWO: Add a Crank
1. Cut 6 inches off the wooden dowel.
2. Drill two 3⁄4-inch holes into the 1-foot piece of lumber set aside in Step One. Drill the first hole about 2 inches from one end, the other hole about 4 inches from the other end.
3. Take the longer dowel piece and glue into the hole drilled 2 inches from one end.
4. Take the 6-inch dowel piece and glue it into the hole drilled 4 inches from the end, on the opposite side of the lumber. This will be your crank handle.
5. Insert the crank fully into the rack. It should turn easily. About 1 inch from the inside edge of the rack, drill a 1⁄8-inch hole through the center of the dowel.
6. Set aside to let glue dry.
STEP THREE: Ring, Ring, Ring
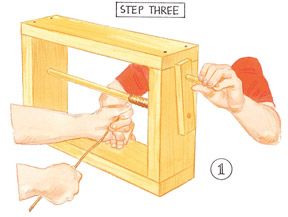 1. Insert one end of the wire into the hole in the dowel and begin turning the crank. Keep turning until the entire length of the dowel has a single layer of tight wire coil. Cut the wire from the roll.
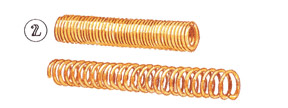 2. Cut the piece of wire that was inserted into the hole to begin the coil. Now you should be able to slide out the crank from the coil and the rack, leaving you with a coil of wire. Slightly stretch the coil.
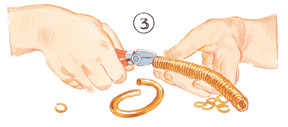 3. Cut the rings from the coil. This should leave you a pile of rings that are just barely open. Make more coils and cut more rings.
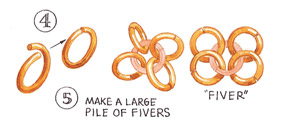 4. Take 4 rings and twist the 2 ends together to make a closed ring. Put these 4 solid rings onto a fifth ring and close this fifth ring so you have a group of 5, four rings on one. This “fiver” is the basic building block for the chain mail armor.
5. Make a large pile of fivers. Also keep a large group of slightly open single rings. When you have a good pile of each, it’s time to begin building the armor.
STEP FOUR: Knitting the Shirt
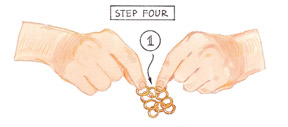 1. Take a fiver and lay it flat, moving 2 rings to the top of the center ring and 2 rings to the bottom. Do the same with another fiver and position it below the first fiver.
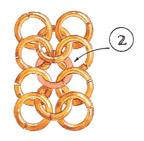 2. Take a single open ring and link the bottom 2 rings of the top fiver to the bottom 2 rings of the bottom fiver. This single ring now links 4 other rings, just like the fivers you have already made. Close this open ring. Even at this early point the rings should
show a pattern, tilted up and tilted down as they rest upon each other. Add 2 more fivers to form a strip of four fivers. Make another strip of 4 fivers.
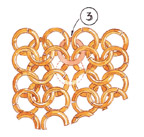 3. Lay a fiver strip flat to the right side of the first fiver strip. Take a single open ring to link the right 2 rings of the top left hand fiver in the strip to the left 2 rings of the top fiver in the right-hand strip. Continue to link the fivers as shown.
4. Hold up the linked fabric. You can “scrunch” the fabric easily in only one direction. Continue to build a large rectangular fabric. The direction of “scrunchiness” goes about the waist.
5. Once the fabric can comfortably circle your torso, with some slack, attach the 2 edges to form a cylinder.
6. Make two strips, at least 3 groups wide, that will attach to the top of the shirt. These will go over your shoulders. When you are done you should be able to put the shirt of chain mail over your head and have adequate area for your arms.
7. Small cylinders of links can be added to make sleeves. Links can also be added to lengthen the shirt, or different colored metal links can be added to decorate the bottom edge of the shirt.
King K. Rule Kool! 😀
I love it! I like knights and other things to do with knights. My brother is also working with my dad to make a wooden sword. That reminds me…
(\__/)
(=”.”=)
(”)_(”)
P.S. I don’t remember making the smiley face message.
P.P.S. I also don’t remember making the Eagle Scout message.
this is a great idea=] Ill have to try it soon
(\__/)
(=”.”=)
(“)_(“)
i’d recommend using galvanized steel wire instead, it’s easier to get a hold of and 3/4 inch rings are way too big. 5/8 or 1/2 at the most.
also you can make jewelry out of maile as well. It can be masculine or delicate and suitable for giving to your lady.
🙂
Does the instructions come with a “title” as in Sir, or Lord of….. and BTW do you know the cost of a 500 foot roll of copper wire? Heaps …Oh well we can only wish
does anyone remember what month magazine had the Eagle scout prjects in it?
It was like… four pages I think.
If anyone can tell me what month or what the cover looked like I would REALLY appreciate it.
thanks
i want his sword not really lol
I love medieval armor and weapons I might try it
ive seen better instructions