How to Make a Fast Pinewood Derby Car

Packs nationwide are gearing up for their annual Pinewood Derby. There are a variety of ways to make your Pinewood Derby car go faster. Explore the following tips to optimize your car’s performance and gain a competitive edge in an upcoming race.
BASIC GUIDELINES FOR PINEWOOD DERBY CAR DESIGN
The possibilities are endless when it comes to picking a shape for your Pinewood Derby car. Before you begin, consider the following general guidelines:
Avoid Pointed Noses: A pointed nose will make it difficult for your Pinewood Derby car to rest on the pin at the starting gate. It may also cause your Pinewood Derby car to get bumped around when the pin drops, and it can create problems for electronic timing systems at the finish line.
Weight Distribution: Leave ample wood in the rear of the Pinewood Derby car so you can place additional weight there. Concentrate the majority of the weight in the rear for optimal performance.
Maximum Weight: Aim for the maximum allowable weight, typically limited to 5 ounces in most races. If your car falls short of this weight, strategically add coins or other weights to meet the requirement.
Clarity in Orientation: Clearly distinguish the front and back of your Pinewood Derby car. In many races, the race officials — not you — will actually place each Pinewood Derby car on the track. Sometimes the officials put the Pinewood Derby car on the track backward because they can’t tell which end is which.
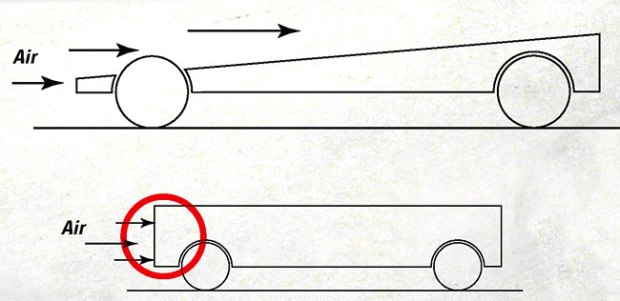
Aerodynamic Design: Select a design that facilitates smooth airflow over and around the Pinewood Derby car body. Pinewood Derby cars with aerodynamic profiles go faster.
See photo galleries of hundreds of Pinewood Derby car designs.

10 STEPS FOR DESIGNING AND BUILDING YOUR PINEWOOD DERBY CAR
You don’t have to strive for the fastest Pinewood Derby car to have fun competing in your Pinewood Derby. But if you and a helpful adult are willing to put in the extra time and effort, these tips are for you.
1. Bake the Block: Start your Pinewood Derby car project by baking the wood block at 250 degrees for two hours. This removes moisture and lightens the block, allowing you to place more weight at the rear of the car where you actually want it.

2. Crafting the Design: Outline your Pinewood Derby car on paper, cut it out, and affix it to the wood block.
Remember, a rectangular car is not an aerodynamic design. The most basic aerodynamic design is a simple wedge. If you don’t have time to design a complex car, a wedge will work just fine.
Download a Pinewood Derby car template PDF to help you create your design.
3. Rough Cut the Design: Use a coping saw or enlist the help of a responsible adult with a power tool to cut out the rough shape of your Pinewood Derby car.
4. Shape Your Car: Smooth edges and shape your car using sandpaper. An adult can assist with a rotary tool or other shaping tools.
5. Sand and Paint Creatively: Reduce friction by smoothing the car’s surface and paint an awesome design to make it look great.
How to paint your Pinewood Derby car to give it a shiny finish.
6. Axles and Wheels Alignment: Make sure they are aligned perfectly straight. You can test the alignment of your axles by pushing your car across a smooth floor or table. It should roll smoothly in a straight line.
— Consider a Three-Wheeler: Raise one wheel about 1/16 inch higher so it never actually touches the track. Less friction = more speed. Rules vary from pack to pack, so make sure to check your pack’s Pinewood Derby rules to make sure three wheelers are allowed in your race.
— Extend the Wheelbase: Maximize the distance between front and rear wheels. Again, make sure this is allowed in your race.
Learn about polishing Pinewood Derby axles and wheels to reduce friction.
7. Secure Axles with Glue: Glue the axles firmly in their holes to ensure that they stay perfectly placed, but make sure you don’t get glue on your wheels.
8. Strategic Weight Addition: Remember to make your Pinewood Derby car as heavy as the rules allow. In general, it’s best to place weight to the rear of your car because a heavier rear increases speed.
Learn scientific Pinewood Derby speed tips from a former NASA engineer.
9. Use Graphite: Add graphite or another dry lubricant to reduce friction. The less friction between the body and wheel, the better.
10. Have fun! And finally, remember the most important rule of a Pinewood Derby is that it’s supposed to be fun. While you should always strive to do your best, don’t get caught up in winning or having the fastest car. Just enjoy the ride.
Adapted from the book “Pinewood Derby Speed Secrets,” DK Publishing, $12.95 softcover.
Can anyone tell me the purpose of baking the block and making it lighter?
Drying the wood eliminates extra weight from the block of wood. The only weight you want to add to the car is some type of metal. There are different densities from different materials you can use. The idea is to have all your weight as low as possible, (center of gravity). It gets pretty scientific after that. Only doing 1 little thing wont make much difference in the speed of the car. But, if you do 10 little things, that is the difference maker. Good Luck!
Nice tip on the “10 little things” – we’re talking mini-seconds with each “little thing” but they do add up..
The purpose is to extract as much moisture as you can from the wood. Moisture is weight, and since you will be adding weight with painting, why not cancel some of that weight by eliminating water that serves no purpose from the wood.
To avoid warping the block from the oven drying process (or risking the possibility), do you think drilling holes in the body to take out weight will do the same thing? If holes are OK, where are the best areas to drill?
Supposedly to make the block lighter to add more non wood weight. The problem with baking the block is that it will more than likely cause the block to shrink a little amd warp. This will leave you with a block that is not square!! The block would have to be vertically grained to minimize this. Most blocks are slab grained with the grain not running at 90 degree angles from top to bottom.Don’t bake the block!!!
To add to this, if you bake Revell brand blocks that are made in China, sap will begin to ooze out. Yep, they aren’t using kiln dried wood so you wind up with a block that is useless because your car will weigh more on one side or the other.
Here is the real secret: Let the boy make the car with your help. Don’t do it for him. Teach him that all ideas are valid. As adults we want to win, as youth, they just want to have fun. Enjoy your derby even if you don’t use all these speed secrets.
Agreed!!!!!
True… But its disheartening when your 5yr old can’t even place or have a chance against a car build by a father who is an engineer…
I was the youngest scout to make it to the finals and I’m confident that with this help I’ll get 1st place for sure!;)
oops, typo alert “youngest scout LAST YEAR to make it to the finals”.
Our pack is FULL of people that say ‘I don’t like that’ or ‘that’s not fair’ What is fair is that you follow your rules and spend time with your boys making and creating the car. My boys design the car, paint the car and I help it GO (faster) I use as many tips as i can get and pass it on to them so they will do them later
Derby rules for us is to use BSA derby axels.
I love this! I will try it!
For Pinewood purposes, the nails in your kit are called “axles.” Most packs cannot use real “axels” on thier cars. But those look COMPLETELY different than nails.
Remember, do your best on your wheels and axles, but it is the wheel alignemnt that wins the race. The Scout stores have some great tools for building a great car and getting a good alignment.
I agree about wheel alignment also proper weight placement. My son who placed first overall in his pack and district events two years in a row spent a lot of time with his alignment and weightt placement. The average time for his car in 2011 on a 42′ aluminum best track were 2.9500 seconds. His best time was 2.9014! Weight placement and alignment are the best tips for any body. It was a shame that he was too ill to race in our region race. Nice chatting with you.
what about the wheels?
I don’t like the idea about raising one wheel to cause less friction…that doesn’t sound fair. Not to mention it is a four wheel vehicle….no where does it say you can use 3 wheels that I have seen.
It’s a simple trick and doesn’t cost a dime. You still have four wheels on the car. Unless your rules prohibit it, you’ll probably end up with at least half the cars with 3 wheels touching the track just by sheer accident. You’d be suprised how many cars show up with a raised wheel without it intentionally being built that way. It is “do your best”…..right?