Make a Civil War pinhole camera
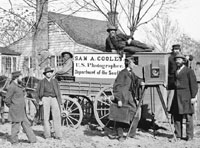 The Civil War was the first time in American history that photography was extensively used to make a public record of events.
The art of photography was only 21 years old when the Civil War started, but it was already hugely popular. For the first time, middle-class Americans were able to have their portraits taken, because photographs were much less expensive than paintings.
Before they left for the war, many Civil War soldiers had their portraits taken by traveling photographers or small photography studios, usually using a type of photography known as ambrotype. Ambrotypes were one-of-a-kind images made on glass or metal and stored in small glass-covered cases.
Photographers not only took portraits of soldiers, they also traveled to camps and battlegrounds. Most of these photographs used a wet-plate negative: a glass plate chemically treated, then exposed to the image from 5 to 30 seconds, creating a negative that could be printed on multiple pieces of paper.
Civil War photographers were not out on the battlefield as fighting was happening; the photographic equipment was bulky and delicate, and the process of exposing and developing the images made it virtually impossible to take action shots.
What photographers did instead was to photograph the battlefield after fighting had ended, often before wounded or dead soldiers could be removed to field hospitals. Field photographers were known to rearrange dead bodies on the battlefield to make their shots look more dramatic.
Here’s how you can make your own Pinhole Camera, much like the ones Civil War photographers used.
WHAT YOU’LL NEED:
- Film—one cartridge of 110-size color film
- Ruler
- Thick corrugated cardboard
- Scissors
- Knife
- Black tape
- Black paper or black paint
- Aluminum foil
- Pencil
- Straight pin or sewing needle
- Two large rubber bands
- Dime or nickel
WHAT YOU’LL DO:
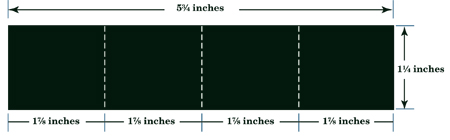 Cut the cardboard to 5 3⁄4 inches long and 1 1⁄4 inches wide. Then measure four equal sections 1 7⁄8 inches wide. Use a knife to cut the cardboard slightly (not all the way through) so that it’s easier to fold.
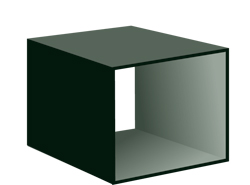 Fold the cardboard into a box and tape it with black tape. Using the black paper, make a lining for the inside of your box.
 Insert the box into the film cartridge, with one of the open sides of the box toward the film cartridge (so that the film cartridge creates a fifth side of the cube). This should be a snug fit.
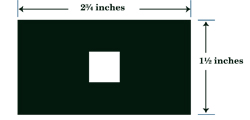 To create the front of the camera, cut another rectangle of cardboard, 2 3⁄4 inches by 1 1⁄2 inches. Line this piece with black paper or paint as well.
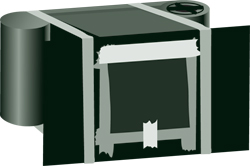
 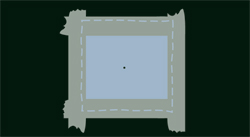 Cut a 1⁄2-inch square hole in the center of this piece of cardboard and tape a 1-inch square of aluminum foil over the hole. Punch a small hole in the foil with the pin, being careful to make it as small as possible.
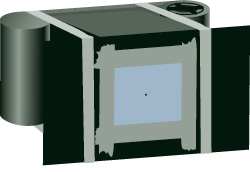 Fasten the front of the camera to the rest of the camera with two strong rubber bands.
- Make sure that no light is leaking into your camera. Use the black tape to cover any holes.
 When you aren’t taking a picture, the hole must be covered by a piece of black paper. Tape paper over the hole or create some kind of shutter that slides across the hole.
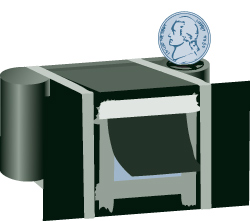 Use the dime or nickel to advance the film, turning it counterclockwise. There is a small window on the side of the film cartridge that will indicate the advancing of the film. The film will be in proper position when the numbers 3 and 4 show up.
HOW TO TAKE A PICTURE:
- Make sure that the camera is stable; the best pictures will be produced when the camera doesn’t move when the film is being exposed. Set it on a solid surface.
- Experiment with different exposure times. One to three seconds should work, but, depending on the amount of sun or light that is available, this time could change. (The film might have a recommended exposure time on it.)
- Cover the pinhole with black paper after each exposure.
- To ensure you get a decent image, take your picture two or three times with different exposure times. The technique of taking three exposures—one with the recommended exposure time, one with twice the time and one with half the time—is called bracketing.
Adapted from “Great Civil War Projects You Can Build Yourself” by Maxine Anderson, published by Nomad Press.
I am totally going to make this!!!!!!!!!!!!:)
I bookmarked this page and will make one later 😀
this ausome
im gonna make it out of cardboard
Of course, if using 110 cartridge film, it’s not strictly period, is it?
I like the pinhole camera great proqect for the summer.
i made one. i only had 1 good pic 🙁
i am definitely using this for my social studies project!!!!!
i am sooooooo using this.!
Nice info!
ramster83, yes, the inside of the box needs to be black. Lighter colors will reflect light inside the box. The black absorbs the excess light. You want any reflected light coming from the subject you are taking a picture of, not from bouncing around inside the box.
Try an experiment: build two pinhole cameras, one with a black interior and one with a white interior. Set them side-by-side so that each one is taking the same picture for the same length of time. When you have the film developed, compare the resulting photographs and you will see why it is important to have a black interior.
bets buying one
Hi all of you guys, I’m going to try making one of this. There is only one thing I do not understand, the inside of the box must be black too?. Please, let me know the answer.
Regards.
this is awesome!!!! I’m so going to make one!!!!! 😀
My sister made one of these and said it was cool.
It rocks
Is this stable? I have to make a Civil War camera and it needs to stand!
cool
does this work really well? i have a project at school and i think it would be very cool to try this.
i think it’s great. a good father/son or grand father/grandson project.
looks cool i hope it works
It seems the film used is a type able to be develped at a 1 hour photo, but I am not shure. The last bit about bracketin your shots is great because there is no light meter to tell you how long to leave the shutter open.
So I tried this but the film wouldn’t turn. So the Camera wouldn’t take a picture.
okay this is great and all but they need a bit more better inst.
i mean i get but wat about the kids in school who have to do projects and they dont understand how to processe it.
but any ways this a great way to teach history.
and i do agree with the ones above me.
Does it work?
great idea, it could be fun to get away from digital cameras, and do it the old fashion way.
Well it looks fun to make
It works great. I can not develop my pictures though. How do you develop them?
THis is a great way to preserve history, and earn photography merit badge. But a thicker substance for the shudder is advised, as some paper lets small amounts of light in, which can cause spot glare.
i thought this was cool and I recomend it for anyone
any 1 play rs?
hi this is a great article kool
thnks
jackson
I like it so much. People should just make one of these instead of buying a camera at the store.
this is a great example of preserving photographic history
This is a rilly grate idea.
It looks cool.
This looks cool. I’d snap pictures of places almost anywhere with one!
I think it is cool. For my science fair I did a project on how
does a Pinhole Camera work? I used wax paper incase of a film.
I enjoyed using this camera.
IT’S SO COOL!!!!!!!!!!!
this is so cool and I told my friends about it to
measurments are wrong in order to have 4 equal sections of 1 7/8inches it must be 6 5/8inches long altogether
Hmmmmmm, Looks Nice In the Picture Instructions!!
This looks fun!
is an exposure when you remove the shutter or what?
awsom
i haven’t used this exact method but i have done this in my photography class and it works amazingly, i love it! You should try it!
i have done this
works very well!!!!!!!!!!!!!!
Thats soooo cool does it really work I think i’ll try it!
COOL!
that is awesome! does it work?
weird.