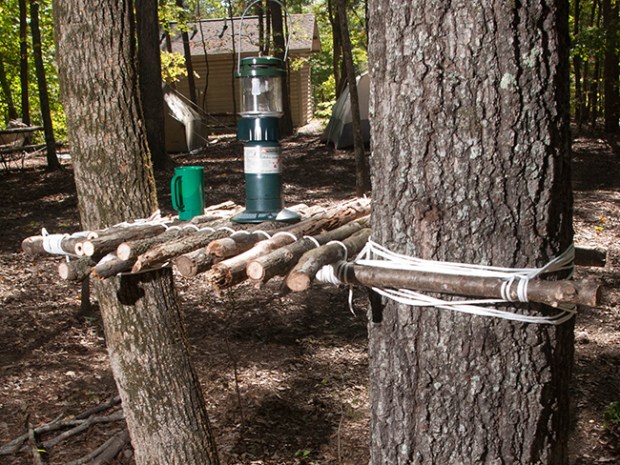
How to Build a Camp Table Between Trees

Keep your stuff out of the dirt by building a table for your camp. It’s easy if you have the pioneering skills.
WHAT YOU’LL NEED
- Two spars up to six feet long (or long enough to be lashed to both trees) and about 3 inches in diameter
- Several shorter spars, the number depending on the distance between the trees
- Two sections of rope, both around 25 feet in length
- Four sections of rope, each around 50 feet in length depending on the diameter of the trees (Each can be made with two sections of 25-foot rope tied together with a square knot, or a sheep’s bend knot if rope is of two different diameters)
WHAT YOU’LL DO
Step One: Pick out two trees up to five feet apart with nothing between them. Have one person hold one of the longer spars horizontally across both trees. Tie a clove hitch around one spar right next to the tree, then use a square lash to attach the spar to the tree.
Step Two: Repeat the square lashing to the second tree at the other end of this spar, and repeat the whole process with the second spar on the other side of the tree. The lashings on both sides of the tree will have to overlap each other to ensure that the spars are level with each other.
Step Three: Lay the shorter spars across the two spars that are now attached to the trees. Lash the shorter spars to the longer spars with a floor lashing.
Step Four: Enjoy your new camp table.
dear peeps doing this video i once saw in an old issue of bl (or the manual) a rope bride where instead of planks of wood hey had a bundle of sticks and i really wan o make i in my back yard bu i canon get my hands on the instructions plz help or somebody reply whit a link or something becuase really waned to do it today but alas i failed
This really seems like a cool thing to do. I can’t wait to try this on my next campout!!!:) 🙂
THis will really help me and other scouts with my woodman’s for fire crafter. and my troop can earn some extra points on camp inspections
Over time I’ve learned the universality of the clove hitch. To answer my previous comment (6-Robin), the square lashing begins and ends with clove hitches. So does the floor lashing. It begins and ends with clove hitches too.
If a picture speaks a thousand words, a video speaks a billion more. However, this video series is less instructive than the flagpole where each step is completely illustrated. For example, in Step One we begin with a clove hitch and proceed with a square lash to attach the spar to the tree but the video does not show how to end the square lash. Also, the other video does not show how to start and end the floor lashing. Regardless, we do learn and have some ideas to build a camp table through the videos. For that we thank Aaron Derr, Kevin Liles, and the Boys’ Life magazine for educating us.
tHAT WAS wonderful
this is awsome i alwase need a good table on camp outs
Im going to recomend this to the socuts that are working on First class, this seems really cool.
This will really help me get my first class rank. thanks
This (second) video is less confusing than the description in the Handbook, I think.