How to Make Wooden Stilts
Click here for a PDF version of these instructions.
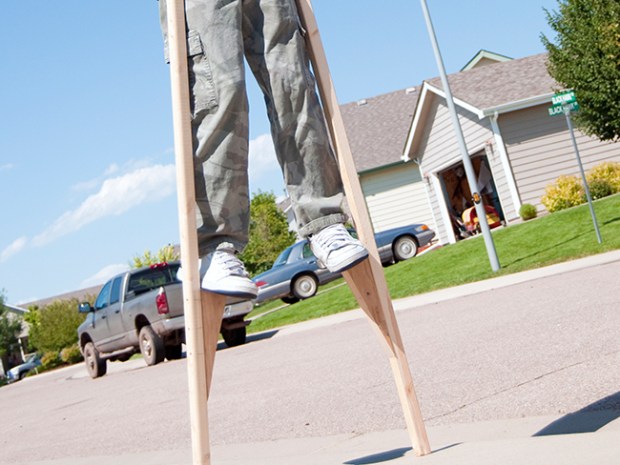
Stand taller — without waiting for a bunch more birthdays to pass — with stilts. After an afternoon’s work, you’ll be able to walk around at least 12 inches taller than you are now. That’s a pretty fast growth spurt!
WHAT YOU’LL NEED
- Two pieces of soft wood, 1 1/2 inches by 1 1/2 inches by 55 inches long for the stilt poles. Choose pieces with straight grain and just a few small knots.
- Two pieces of hardwood, 1 1/2 inches by 2 1/2 inches by 5 1/2 inches long for the footrests. These should be knot-free.
- Four 1/4 inch by 4 1/2 inch carriage bolts, with flat washers and cap nuts. You’ll use these to fasten the footrests to the stilt poles.
- Coping saw
- Drill with a 1/4-inch spade bit
- 80- and 120-grit sandpaper
- Miscellany: a few 1-inch finishing nails, a hammer, a pencil, wire cutters, two clamps, wood glue and a spokeshave (small plane) will be useful if you can find one.
- Adult permission and/or supervision
WHAT YOU’LL DO
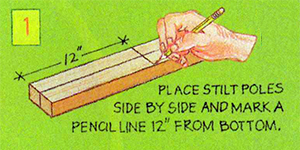 STEP 1: Place the stilt poles side-by-side on your workbench and mark a pencil line across one face of each pole, 12 inches from the bottom ends. This marks where the top of the footrests will go later. You could attach these higher up, for greater walking height, but use the 12-inch level for your first pair of stilts.
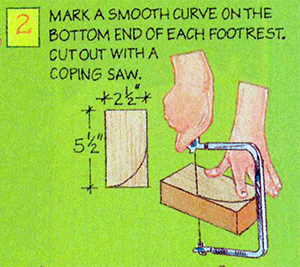 STEP 2: Take the footrests and mark a smooth curve on the bottom end of each one. Use your coping saw to round the bottom of each footrest following these lines. This makes them look better than if you left them square.
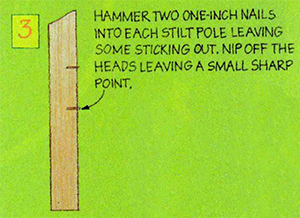 STEP 3: Hammer two one-inch finishing nails almost all the way into the side of each stilt pole, within the area where the footrests will attach. Nip the heads off these nails using your wire cutters, leaving a small, sharp point just above the stilt poles’ surface. These will prevent the footrests from sliding around when you glue them on.
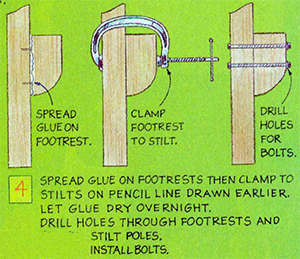 STEP 4: Spread glue on the longest edge of each footrest, then clamp them onto the stilt poles following the pencil marks you drew earlier. After it has dried for about an hour, scrape off the extra glue, then let the stilts dry fully overnight. Afterward, drill two holes through the footrests and stilt poles, then install the 1⁄4-inch carriage bolts to add strength.
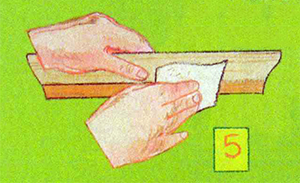 STEP 5: Use your sandpaper or spokeshave to angle all sharp edges. It’s especially important to round the bottom end of the stilts so they won’t splinter during use. You can add paint or varnish if you like, but this isn’t necessary.
TAKING THE FIRST STEP
Always use your stilts outdoors, never inside. When it comes time to hop on for the first time, step onto the footrests from a box or step that’s roughly 12 inches off the ground.
As you lift each foot to take a step, pull up on the stilt poles with your hands so the footrests stay on the bottom of your feet as you travel forward.
It takes a little practice, but soon you’ll be commanding the respect that comes from a higher view of the world.
i am going to make 8 feet high stils
HaHaHaHaHa
great idea but be careful
🙂
awsome
awesome 😛
i might make some
I love stilts they cost about $40.00 and this is a lot cheaper and I think it’s great
I am making some right now, but not this design. All I need is the
bolts and it is done.
My dad made some and never looked at this page 🙁
cool but why
I made some stilts about thirty-six inches high!! There great!!! I can lean against the gutters of our house!!!
I’m going to try