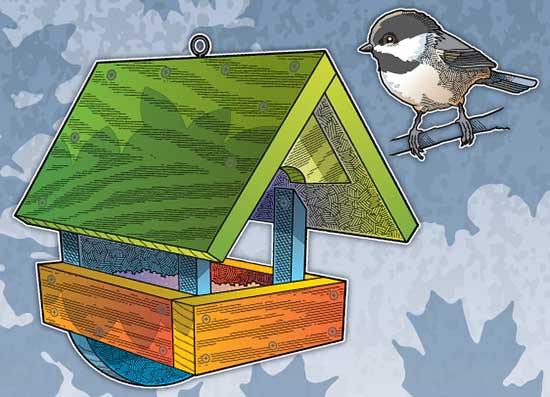
How to build a bird feeder
Help keep wintering and migrating birds fed with this handmade bird feeder.

WHAT YOU’LL NEED
- 1″ x 8″ x 6′ cedar board (Make sure you prime and paint the feeder if you use another type of wood.)
- 1/2″ eye screw
- About 40 1-1/2″ exterior wood screws
- Ripsaw
- Crosscut saw
- Jigsaw or coping saw
- Drill
- 1 1/2″ drill bit
- Countersink bit
- Exterior wood glue
- Screwdriver
- Sandpaper
- Paint
WHAT YOU’LL DO
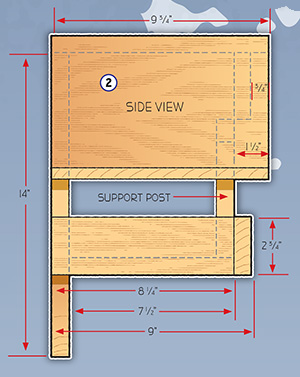
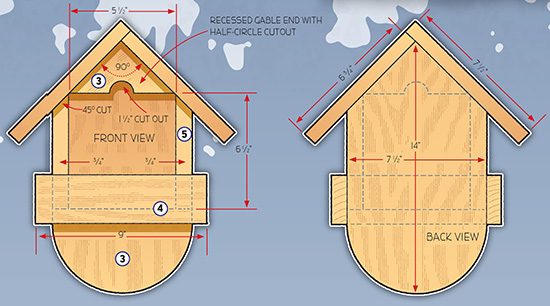
 1. Cut out all the parts of the feeder by carefully following the dimensions shown.
Cedar is a great weather-resistant wood for outdoor use, but it can crack and split if you’re not careful when building. It’s important to predrill and countersink all the screws to prevent splitting. Countersinking positions the screw heads slightly below the wood’s surface.
All wood parts are glued and screwed together.
2. Glue and screw the roof together.
3. Glue and screw the back and recessed gable end onto the roof.
4. Attach the sides to the bottom, and screw and glue them in place. Ask an adult for some help. It’s difficult to hold the pieces together when drilling and countersinking the holes.
5. Glue and screw the support posts in place.
6. Sand the feeder with fine sandpaper. (You might find it easier to sand each piece before assembling.) Paint your feeder.

FEEDING THE BIRDS
During the winter, your feeder is helpful because natural foods can become scarce for the birds living year-round in your area.
Your feeder can help spring and fall migrating birds build up reserves of energy for their long journeys.
Different species of birds eat different kinds of food. This feeder is designed to hold seed. Other feeders are designed to offer foods such as fruit and grubs. Learn about the birds in your area and what they eat.
it is cool
the box part is too deep, you to cut the depth by a third.
I love to watch birds😍😘😁.