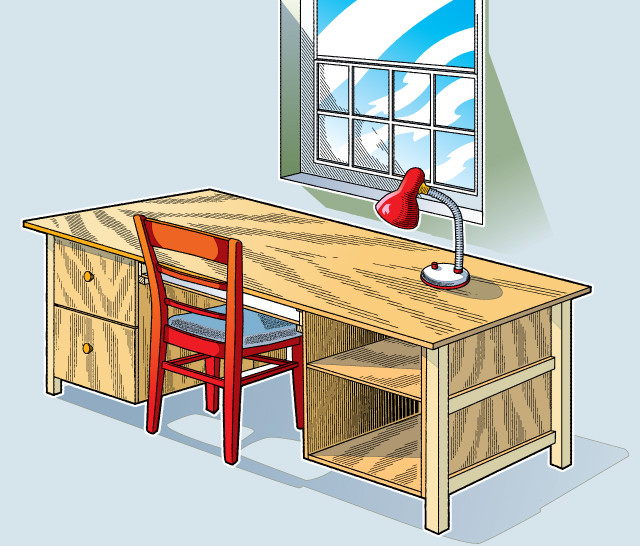
Build a Custom Desk
 What You’ll Need:
• 1 sheet 3/4-inch hardwood plywood
• 1 sheet 1/2-inch 7-ply plywood
• 1/2 sheet 1/4-inch ACX plywood
• 25 feet 3/4-inch edge banding
• 5 feet 1/2-inch edge banding
• 1 1/2-inch by 1 1/2-inch solid oak or fir, 2 pieces, each 8 feet long
• 3/4-inch solid oak, at least 6 1/2-inches wide and at least 10 feet long
• 2 1/4-inch screws
• 1 1/2-inch screws
• 1-inch screws
• 3/4-inch screws
• Wood glue
• Masking tape
• Sandpaper
• Pure tung oil or polyurethane finish
• 2 drawer pulls
• Tools
• Table saw or circular saw (adult use only)
• Crosscut miter saw (adult use only)
• Drill
• Two 4-foot clamps
• Screwdrivers
• Tape measure
• Carpenter’s square
• Clothes iron
• Safety glasses
To begin, download a list of cuts you will need to make before assembling by clicking here.
Follow these woodworking tips:
Safety
Always wear safety glasses and make sure all safety guards are in place before using power tools. Ask an adult to help you with power tools.
Wood glue
Apply a thin, even coat of glue to both pieces of wood. Clamp glued pieces together.
Carpenter’s square
Always use a carpenter’s square for right angles.
Predrilling
Predrill with 1/8-inch bit. To keep from drilling all the way through wood, put masking tape on your drill bit marking screw length from the tip.
Stop drilling when the tape meets wood. Enlarge hole 1/4-inch deep with a 1/4-inch bit. Screw each screw all the way in, making sure the head goes inside the wood (countersunk). Wipe off excess glue with a wet rag.
Edge banding
Edge banding comes in a roll with heat-activated adhesive. Edge banding is applied to all exposed plywood edges and provides a neat, finished appearance. You can use a clothes iron to heat edge banding. Keep the iron clean by placing a sheet of paper between the iron and the banding.
What You’ll Do
Note: Understand all instructions before beginning. Ask an adult to help you with power tools.
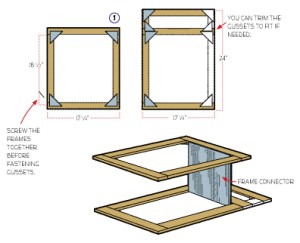
 Step 1. Assemble module frames
Place frame facedown. Screw corners together and attach gussets with screws and glue. Connect frame by screwing and gluing frame connector in place.
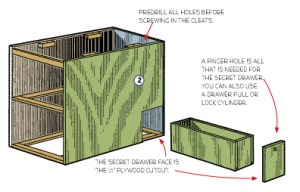
 Step 2. Build drawer and shelf modules
Screw and glue frame into drawer module. Screw and glue shelves into shelf module. Attach back and desktop cleats to both modules.
Step 3. Build drawers
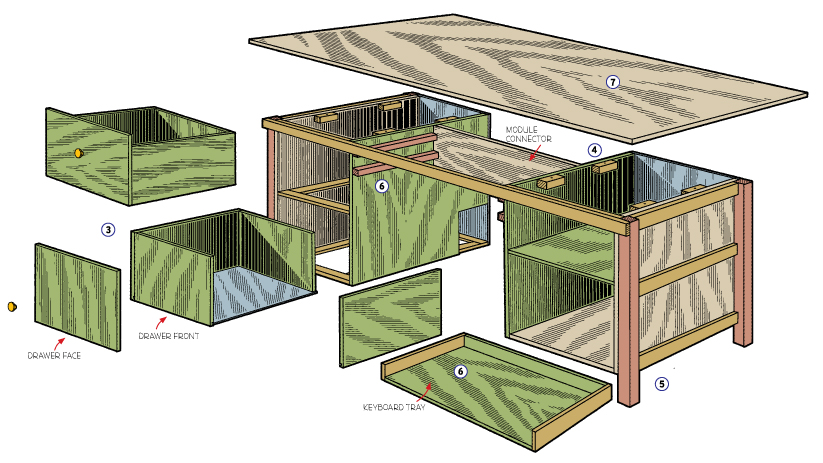
Ask an adult to use a table saw to cut a groove 1/4-inch deep and 1/4-inch wide in the front and sides of both drawers for the drawer bottoms. Glue and screw the front, sides and back together on both drawers. Slide the bottom of both drawers in place. Do not glue the bottom. Insert the drawer into the desk and center the drawer front. Make sure all drawers slide smoothly and fit neatly in place. Glue and clamp the drawer face onto both drawers. Repeat this process for the secret drawer.
Step 4. Connect the two modules
Screw and glue the module connector board to both modules as shown.
Step 5. Attach legs and trim
The legs and trim are screwed in place from the inside. The trim should cover all exterior screw holes. The long front trim piece should help hold the modules in place until the top is attached.
Step 6. Assemble keyboard tray and tray rails
Screw and glue the keyboard tray together. Screw the keyboard tray rails in place from the inside.
Step 7. Attach the top
Position the desktop evenly on the modules. Screw through the cleats into the bottom of the desktop. Sand all visible surfaces with 220-grit sandpaper and apply a finish of your choice. Screw in drawer pulls.

Looks good, I am in need of a desk (mine can only hold a laptop and a mouse) and this would be a good one.
Great design but a bit big
Takes to much space
It seems very vauge, the directions, i mean.
I think it would be a great project for me and my dad but it would be really pricey
I want to make one
I needed a desk and heres one
I built almost this same design into the bottom of my custom loft bed and it works great.
Do you have a picture? Would like to do this.
i wish i could make one
dude you totally can!
I think that me and my grandfather can build it! : ]
I really want to build one, but I don’t know how big it is, and I don’t want to start and find out it is too big for my bedroom. What is the size?
72″ X 30″ i think
you could just adjust for the space you have
looks a little hard,but it looks AWESOME!!!:)
this doesnt take long if you can read
I’m adding this to my to do list when i visit my uncle’s workshop next summer.
Looks cool might make it later…. But looks like a cool table for Amatuer Radio
I wish I had enough money for this. It looks like something you would find in a regular workshop!
The instructions are very off when my dad an i built this. It turned out a nice design, but it took over a year to build because of imprecise directions. Great idea, but go to another site for instructions.
thanks for the heads up
If you can’t find 1 1/2 inch square pieces, get two 1×2’s and glue them together (clamp too). They didn’t sell 1×8 in ten foot sections, so we bought an extra 1×2 and moved some of the cuts around since most of the cuts are 1 1/2 inches anyway.
can someone give me better instructions?
I’m a little afraid to start this project because the directions seem to vague. any help?
its awsome! and its not missing any pieces.
It is a cool desk however the instructions can be way better. Also it is missing a block of wood which can really throw you off
i need the dimentions for desk parts
How long does this desk take to make?
1 hour
Well I really want to make one today.
My dad made me one and then made more for the other kids in my family because it is so great. Large, and doesn’t take a very long time to make.
how much does it cost to make
How much does it cost?
it depends where you shop for your materials
how much does one of these cost?
to make
it looks so cool
how much does it cost to make one?
The list is missing the legs…. I’m starting the desk today.
thanks for telling us that will help alot
No, it is not missing the legs, you probably misread it but it is missing a gusset
Jeffery and David did a great job with the plans. Turned out rock solid and beautiful. Finally have a nice place for all my Scout stuff.
How long do you estimate this project to ttake for someone with moderate to good skills?
from 1 hour to 2 hours
Cool:)
I really hope i can make this!
The desk turned out really nice. I want to see the come out for directions to build a entertainment center or a dog house!!!!
I totally agree man!!
agreed!
takes so long to build