How to Make a Fast Pinewood Derby Car

Packs nationwide are gearing up for their annual Pinewood Derby. There are a variety of ways to make your Pinewood Derby car go faster. Explore the following tips to optimize your car’s performance and gain a competitive edge in an upcoming race.
BASIC GUIDELINES FOR PINEWOOD DERBY CAR DESIGN
The possibilities are endless when it comes to picking a shape for your Pinewood Derby car. Before you begin, consider the following general guidelines:
Avoid Pointed Noses: A pointed nose will make it difficult for your Pinewood Derby car to rest on the pin at the starting gate. It may also cause your Pinewood Derby car to get bumped around when the pin drops, and it can create problems for electronic timing systems at the finish line.
Weight Distribution: Leave ample wood in the rear of the Pinewood Derby car so you can place additional weight there. Concentrate the majority of the weight in the rear for optimal performance.
Maximum Weight: Aim for the maximum allowable weight, typically limited to 5 ounces in most races. If your car falls short of this weight, strategically add coins or other weights to meet the requirement.
Clarity in Orientation: Clearly distinguish the front and back of your Pinewood Derby car. In many races, the race officials — not you — will actually place each Pinewood Derby car on the track. Sometimes the officials put the Pinewood Derby car on the track backward because they can’t tell which end is which.
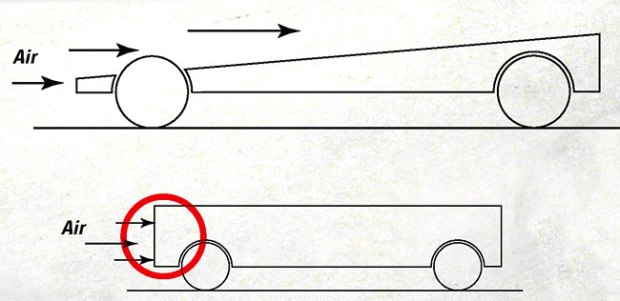
Aerodynamic Design: Select a design that facilitates smooth airflow over and around the Pinewood Derby car body. Pinewood Derby cars with aerodynamic profiles go faster.
See photo galleries of hundreds of Pinewood Derby car designs.

10 STEPS FOR DESIGNING AND BUILDING YOUR PINEWOOD DERBY CAR
You don’t have to strive for the fastest Pinewood Derby car to have fun competing in your Pinewood Derby. But if you and a helpful adult are willing to put in the extra time and effort, these tips are for you.
1. Bake the Block: Start your Pinewood Derby car project by baking the wood block at 250 degrees for two hours. This removes moisture and lightens the block, allowing you to place more weight at the rear of the car where you actually want it.

2. Crafting the Design: Outline your Pinewood Derby car on paper, cut it out, and affix it to the wood block.
Remember, a rectangular car is not an aerodynamic design. The most basic aerodynamic design is a simple wedge. If you don’t have time to design a complex car, a wedge will work just fine.
Download a Pinewood Derby car template PDF to help you create your design.
3. Rough Cut the Design: Use a coping saw or enlist the help of a responsible adult with a power tool to cut out the rough shape of your Pinewood Derby car.
4. Shape Your Car: Smooth edges and shape your car using sandpaper. An adult can assist with a rotary tool or other shaping tools.
5. Sand and Paint Creatively: Reduce friction by smoothing the car’s surface and paint an awesome design to make it look great.
How to paint your Pinewood Derby car to give it a shiny finish.
6. Axles and Wheels Alignment: Make sure they are aligned perfectly straight. You can test the alignment of your axles by pushing your car across a smooth floor or table. It should roll smoothly in a straight line.
— Consider a Three-Wheeler: Raise one wheel about 1/16 inch higher so it never actually touches the track. Less friction = more speed. Rules vary from pack to pack, so make sure to check your pack’s Pinewood Derby rules to make sure three wheelers are allowed in your race.
— Extend the Wheelbase: Maximize the distance between front and rear wheels. Again, make sure this is allowed in your race.
Learn about polishing Pinewood Derby axles and wheels to reduce friction.
7. Secure Axles with Glue: Glue the axles firmly in their holes to ensure that they stay perfectly placed, but make sure you don’t get glue on your wheels.
8. Strategic Weight Addition: Remember to make your Pinewood Derby car as heavy as the rules allow. In general, it’s best to place weight to the rear of your car because a heavier rear increases speed.
Learn scientific Pinewood Derby speed tips from a former NASA engineer.
9. Use Graphite: Add graphite or another dry lubricant to reduce friction. The less friction between the body and wheel, the better.
10. Have fun! And finally, remember the most important rule of a Pinewood Derby is that it’s supposed to be fun. While you should always strive to do your best, don’t get caught up in winning or having the fastest car. Just enjoy the ride.
Adapted from the book “Pinewood Derby Speed Secrets,” DK Publishing, $12.95 softcover.
Pinewood derby
I have done well with my pinewood derby yesterday but I was position two and I won a
Medal and I wish I do better than that next time
Can I set the wheels up magnetically so they don’t touch the car n float on the axle
Is a 4 wheeler or a 3 wheeler better for racing and do you pu two wheels in the front or back for more speed if the 3 wheeler goes faster
I would advise against baking the block “to remove moisture and make it lighter,” for two reasons. First, baking the block may cause the wood to warp or twist, and a crooked block would make wheel alignment very difficult. And secondly, to “make it lighter” ?!! Are you kidding me?!! WHY make it lighter just to add more weight to it? This is a totally unnecessary (and potentially damaging) step. You are better off leaving the block’s minimal moisture content as is.
I was thinking the same thing. A “raw” pinewood derby block with wheels and axles attached doesn’t even weigh 5 oz. so why are we concerned with drying the wood to make it lighter? Not a good piece of advise at all . . .
The lighter you can make the body, hence material removal and drying, the more weight (tungsten & tungsten puttty is best for this in thin / light cars) that can be concentrated to the proper spots in the rear creating more potential energy. Every little bit adds up in speed, Pinewood Derby races are won in hundredths of a second.
Because you want all the weight three quarters of an inch in front of the rear axle
I think the idea is to remove the water weight so that you can be strategic in weight placement.
I have pre-cut axle holes in my wood.how do I do a 3-wheeler???
Anonymous,
When they say “Make a three-wheeler”, they are referring to the practice of raising or bending up one of the front wheels so only three wheels make contact with the track. In theory this reduces friction thus making the car go faster.
Again, as with most of these speed tips, check your Pack and District rules first to see if these practices are allowed! It would be a shame to have a scout’s car get disqualified at check-in/registration because of an illegal procedure learned from this website!
It’s allowed when I race but I wouldn’t suggest it because it didn’t work for me.
for the guy who asked how to make a three wheeler. it is easy. you use a drill to make one hole higher. 🙂
Extending the wheelbase may not be allowed. Check the rules from your Pack and District first!
Scouts and parents, please remember to check your own Pack’s rules about the wheels. Our pack requires all four wheels to touch the track which is also true at the District level of racing. I would hate to see someone put so much time into there cars and design the wheels with just three touching the track, only to be told they have to fix the fourth wheel before race time. Making adjustments to the wheel just before race time is risky.
To add weight at the back of the car cut an hole roughly the size of an quarter and put as many quarters as you need to get to the weight limit.(Do not pass the limit of weight I your pack for example in pack 422 the weight limit is 5 ounces in 2014)
we have a derby on saturday so good luck to me and good luck to all.
good luck