Twist Wire to Make a Great Present
Mother’s Day is coming up. Not sure what to give her this year? Think metal. The wire kind, that is. With a few tools, you can twist and turn it into something that’s functional and easy on the eyes. Here’s how to wire up some new things around the house for mom’s stuff.
KEY RACK
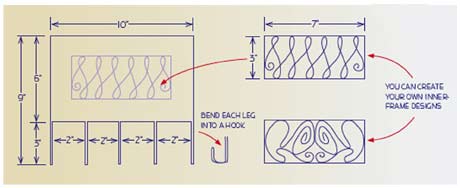 What you’ll need:
- Wire cutters
- Needle-nose pliers
- Hammer
- 1⁄2-inch-diameter dowel
- Adjustable jig (Jig plans are below.)
- 70-inch length of 12-gauge wire
- 24-inch length of 12-gauge wire
- 2 8-foot lengths of 17-gauge wire
- Approximately 30 feet of 24-gauge wire
- 5 feet of 18-gauge wire
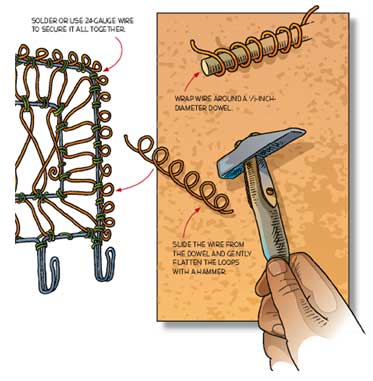 What you’ll do:
- Frame and Hooks: Bend a 70-inch piece of 12-gauge wire. Shape the hooks with needle-nose pliers.
- Inside: Make a 3-by-7-inch rectangle out of 12-gauge wire. Use 17-gauge wire and an adjustable jig to create a design to fit inside. Center this rectangle inside the frame.
- Then make another design to fill the space between them. Solder or use 24-gauge wire to secure it all together.
- Trim: Wrap 5 feet of 18-gauge wire around a 1⁄2-inch-diameter dowel. Slide the wire from the dowel and gently flatten the loops with a hammer, then stretch them slightly.Attach along the outside edge with 24-gauge wire.
FOLDER HOLDER
 What you’ll need:
- Linesman pliers
- Superglue
- 1 22-inch length, 2 16-inch lengths and 3 28-inch lengths of 6-gauge copper wire
- Approximately 25 feet of 24-gauge wire
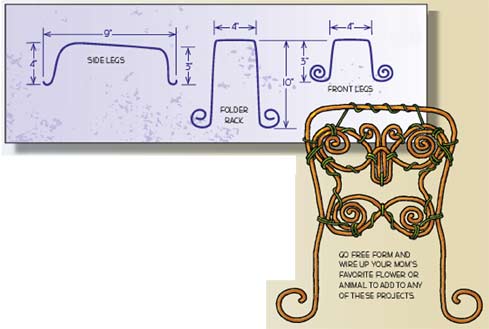 What you’ll do:
- Front: Bend the ends of a 22-inch length of 6-gauge copper wire into two spirals.
- Bottom: Cut two 16-inch lengths with linesman pliers. Measure in 3 inches from the front and 4 inches from the back, and bend at right angles.
- Attach these base wires to the front spiral piece by wrapping with 24-gauge wire.
- Center: Cut two or three 28-inch lengths for the racks. Bend as shown.
- Bind each rack to the base at 2-inch intervals.
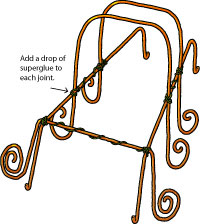
- Add a drop of superglue to each joint.
LETTER BASKET
What you’ll need:
- Linesman pliers
- Needle-nose pliers
- File
- Adjustable jig (jig plans are below)
- 8 twist ties
- 25-inch, 23-inch and 18-inch pieces of 12-gauge wire
- 6-foot and 4-foot lengths of 17-gauge wire
- 10-foot length of 17-gauge or heavier wire
- 25 feet of 24-gauge wire
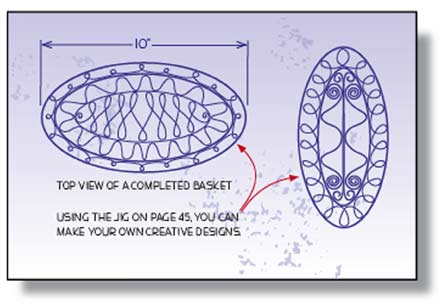 What you’ll do:
- Rims: Make three ovals from 25-inch, 23-inch and 18-inch pieces of 12-gauge wire. File ends flat and smooth.
- Bottom: Using an adjustable jig and the 6-foot length of 17-gauge wire, make a pattern to fill the smallest oval. Weave it into place with a piece of thread-like 24-gauge wire.
- Create a second pattern to fill the space between the smallest and middle-sized ovals from the 4-foot length of wire. Secure it first to the inner rim, then the outer.
- Sides: Use the 10-foot length of 17-gauge or heavier wire to make a 27-inch-long, 3-inch-high pattern on the adjustable jig. Form the side of the basket by temporarily binding it to the outer bottom rim and top rims with twist ties.
- Use 24-gauge wire to permanently attach it.
This pattern can be adapted to create different size baskets.
PEN AND PENCIL CADDY
What you’ll need:
- Wire cutters
- Needle-nose pliers
- 8 6-inch lengths and 2 12-inch lengths of 16-gauge wire
- 2 5-inch pieces of fine wire for binding
- Empty frozen juice container
- Soldering iron
- Solder
- Tape
- Flux (substance that helps the solder flow and prevents oxidation of the metal)
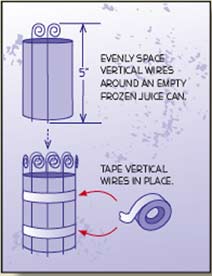 What you’ll do:
- Cut eight 6-inch lengths of 16-gauge wire. Use needle-nose pliers to bend the top inch of each into a spiral.
- Tape the vertical pieces around an empty frozen juice container.
- Tightly wrap the two 12-inch lengths of wire around the design, a few inches apart. Temporarily bind their ends together with fine wire, leaving space to solder.
- Wherever two pieces of metal overlap, brush with flux and solder together with a soldering iron.
- Slide your design off the juice can and trim the bottom ends.
- Use the juice can bottom as the base.
- Fold the vertical wires under the juice can bottom.
WASTEBASKET
To make a matching waste paper basket, just scale up the pen and pencil holder. You’ll have to use thicker wire (try 10 gauge) and increase the number of times the design repeats. For the base, remove the bottom of a large catering-sized can with tin snips.
A JIG OF YOUR OWN
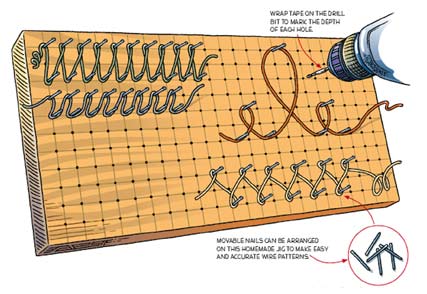 An adjustable jig is the way to go when bending wire patterns. Wrap wire around its movable pegs to quickly and accurately make patterned ribbons. To make one, draw a 1⁄2-inch grid on the surface of a flat 6-by-12-inch piece of wood. Where lines intersect, drill 3⁄8-inch-deep holes with a 7⁄64-inch drill bit. To keep their depth uniform, mark the drill bit with a piece of tape. Make patterns by slipping 2-inch 6d finish nails into the holes. Wrap wire around the nails, then slip the pattern off the jig.
WHICH WIRE?
Not sure which wire to use? Aluminum, copper and annealed steel wire are all common and easy to work with. Galvanized steel wire doesn’t rust as easily as the black annealed type, but it’s also harder to bend. You can find a variety of wire types and gauges in hardware, craft and garden stores. Mix and match to customize the look of your project.
WORKING WITH SOLDER
- Never worked with a soldering iron before? Remember: Safety first. Ask an adult who knows to show you how.
- Some wires have a coating that needs to be scrubbed with a wire brush and soap before they can be soldered.
Like the sight !!
Love it
i made up some of my own!