How to Build a Backyard Mini Golf Course

With this simple project, you’ll be outside playing mini golf in no time. Build your course with any available combination of bricks, wood, aluminum siding … whatever works.
A backyard mini golf course is best played with a croquet set, because the balls are larger and easier to control, but golf equipment is fine, too, especially for advanced players.
No backyard? Try making a bottle-cap disc-golf game. You can also play mini golf online!
WHAT YOU’LL NEED TO MAKE A DIY MINI GOLF COURSE
You or a neighbor might have some 2-by-4’s or a stack of cinderblocks behind the garage, or ask at a construction site if you can haul away some of their cast-off masonry and lumber. Go to a hardware store for everything else you need or to pick up a few extras.
Total cost for your backyard mini golf course depends on your own resourcefulness, the size of your course and the complexity of each hole. Common red cement bricks sell for as little as 22 cents apiece; count on buying at least 100. Also look for things like a roll of chicken wire (about $5), 20 gardening stakes ($6) and a few boards ($15 max.).
Innovation is the key. Experiment. You might build one mini golf hole in 15 minutes but invest an hour in the next, carefully aligning a series of ramps or cutting doors in a cardboard box.
There’s no need to mess up the yard — use a croquet stake, a wicket or even just a piece of duct tape on the ground as your “hole.”
Here are three classic mini golf designs to get you started.
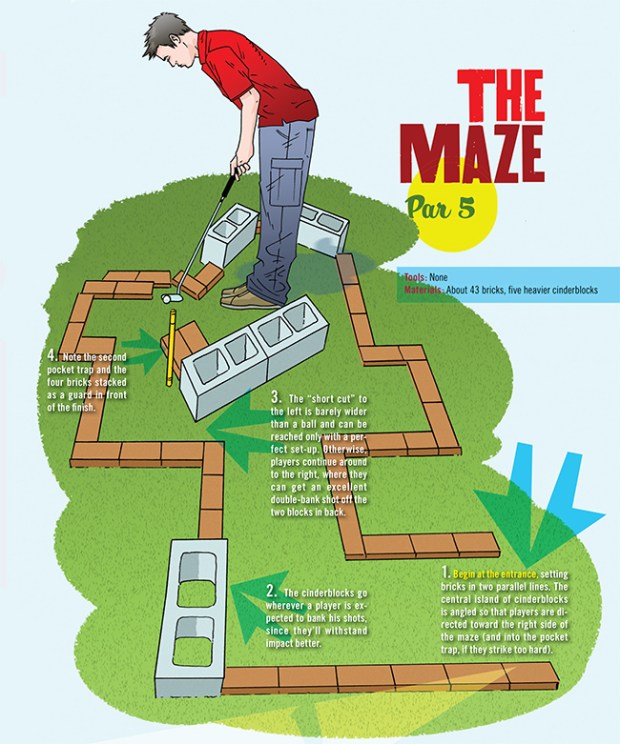
THE MAZE: Par 5
Tools: None
Materials: About 43 bricks, five heavier cinderblocks

1. Begin at the entrance, setting bricks in two parallel lines. The central island of cinderblocks is angled so that golfers are directed toward the right side of the maze (and into the pocket trap, if they strike too hard).
2. The cinderblocks go wherever a player is expected to bank his shots, since they’ll withstand impact better.
3. The “short cut” to the left is barely wider than a ball and can be reached only with a perfect set-up. Otherwise, players continue around to the right, where they can get an excellent double-bank shot off the two blocks in back.
4. Note the second pocket trap and the four bricks stacked as a guard in front of the finish.
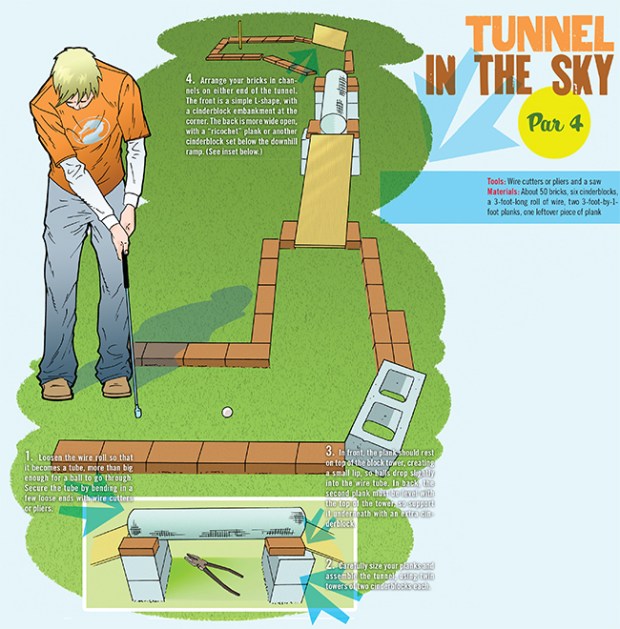
TUNNEL IN THE SKY: Par 4
Tools: Wire cutters or pliers and a saw
Materials: About 50 bricks, six cinderblocks, a 3-foot-long roll of wire, two 3-foot-by-1-foot planks, one leftover piece of plank

1. Loosen the wire roll so that it becomes a tube, more than big enough for a ball to go through. Secure the tube by bending in a few loose ends with wire cutters or pliers.
2. Carefully size your planks and assemble the tunnel, using twin towers of two cinderblocks each.
3. In front, the plank should rest on top of the block tower, creating a small lip, so balls drop slightly into the wire tube. In back, the second plank must be level with the top of the tower, so support it underneath with an extra cinderblock.
4. Arrange your bricks in channels on either end of the tunnel. The front is a simple L-shape, with a cinderblock embankment at the corner. The back is more wide open, with a “ricochet” plank or another cinderblock set below the downhill ramp.
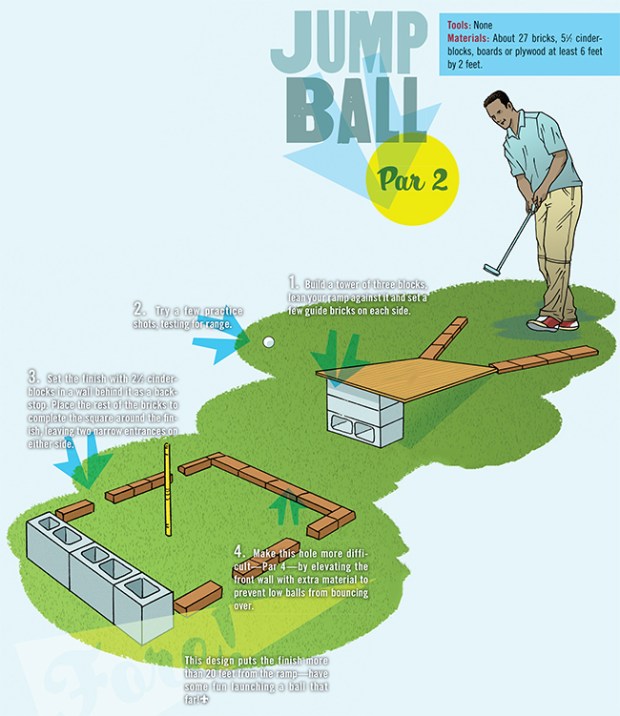
JUMP BALL: Par 2
Tools: None
Materials: About 27 bricks, 5 1/2 cinderblocks, boards or plywood at least 6 feet by 2 feet.

1. Build a tower of three blocks, lean your ramp against it and set a few guide bricks on each side.
2. Try a few practice shots, testing for range.
3. Set the finish with 2 1⁄2 cinderblocks in a wall behind it as a backstop. Place the rest of the bricks to complete the square around the finish, leaving two narrow entrances on either side.
4. Make this mini golf hole more difficult — Par 4 — by elevating the front wall with extra material to prevent low balls from bouncing over.
This design puts the finish more than 20 feet from the ramp — have some fun launching a ball that far!
OTHER IDEAS FOR HOLES
Bumper Ball is any channel that has been randomly spiked to make a forest of obstacles. Use tent stakes, croquet wickets or gardening stakes.
The Chute is a variant of Tunnel in the Sky, with only one tower and ramp, using either five-inch drain pipe or a length of rain gutter to lead back to earth.
The Mousetrap is a big open-topped cardboard box, properly weighted down, with two or more doors cut into its face but only one way out.
Tidal Wave is a series of low ramps to jump across.
Volcano is a ramp that must be finessed, with the finish directly below the edge of the ramp.
Shotgun is a long open space with three narrow courseways on the far side, all but one of which are pocket traps.
The Long Maze might run to par 10 and is hilarious for croquet rules as players battle and hunt each other among the twists and turns.
SCORING AND RULES FOR BACKYARD MINI GOLF
Par is the term for the average number of stokes it takes to complete a golf hole. Always set par at a number that can reasonably be bested by one stroke. This score, one below par, is called a Birdie. On the Maze hole, if a player is able to get into the shortcut, he might finish in four strokes. Therefore, this design is a Par 5.
A backyard mini golf course can be played in many ways.
Golf rules means the player with the lowest total strokes is the winner.
Croquet rules means the first player to reach the end of the course takes the trophy — and by striking another player’s ball, you earn an extra turn (or you can use it to smack that ball into an unfavorable spot).
Before you start, set all rules in stone. If a ball shoots sideways off Tunnel in the Sky, can that player take a “drop” back inside the brick walls? Does that cost him an extra stroke? Or does he have to work all the way back around to the entrance? Is there a maximum number of strokes at each hole (at amusement parks, it’s usually six) or do you play on until you’re successful, no matter the challenge?
It’s your game — you make the rules.
My friend and I used a Croquet set for miniature golf course in the backyard.
Wow, definatly doing this!
This is an awesome idea especially since I want to work on the golf merit badge
that was awesome!!!!
What about a loop?
Thanks, that was some great advice
BEST IDEA EVER!!! 😉
This is so helpful for a math project to build a mini golf corse.
cool project really fun
awsome idea
cool but crazy
Golf is my favorite sport!Thanks!
boring
awesome cool can you teach me how to do that! I wonder how you gise get all that materials from each other.(=
awesome so cool!(=
I am already building one but I was stuck with ideas, this was great!
lov it so much i shall use it for my own golf course in my garden
cool idea
What about golf clubs
What to use for cups?
it is a great idea im building a mini golf course at my school and its great!
i think it would be all right if u cut the grass
Awesome!!! I love golfing
Novel Idea. I love it.
Cool Idea.
Im having a party and im going to use these ideas for the guest
I think building such golf courses are really great, i wonder if we require modulus function when building such courses, like the angle etc.