Build a working robot
Click here for a PDF version of these instructions.
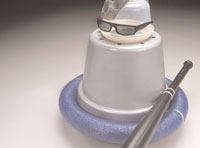 In September 1990, Boys’ Life readers met GISMO 3, an easy-to-build robot that sat atop the chassis of a radio-controlled toy truck. Thousands of GISMO-Guys built some incredible ‘bots that boggled the imagination.
Now GISMO is back and ready to rumble. Our newest member of the clan, GISMO 4, is a bumper-bot. He’s ready to do battle, Sumo style, against other GISMOs or roll around the house or yard for a joyride without denting people or furniture.
GISMO 4 is wicked quick, controllable by remote up to 70 feet away.
You can build the basic GISMO for about $60. Spend less if you can find parts around the house. Several readers who built our last GISMO found inexpensive working radio-controlled trucks at flea markets or garage sales.
GISMO’s head is a clear plastic food storage container. His body can be made from a number of round plastic containers, as long as there is enough clearance for the wheels. We used a large plastic planter pot, but you could substitute a laundry basket or wastebasket for the body shell. Outside the body, we attached a plastic foam bumper.
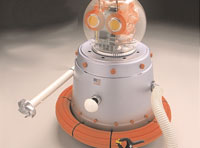 The heart of GISMO 4 is a radio-controlled truck chassis, including motor and wheels. Choose a 4 x 4 style truck with a rugged motor and good traction.
We used a Nikko Dodge Power Wagon. With high ground clearance and knobby balloon tires, it runs well even on carpet. It also comes with a rechargeable battery system. Other remote control trucks will work too.
If you plan to have Sumo-style ’bot battles with friends, choose remote-control vehicles on different radio frequencies so they don’t interfere with each other. You’ll find the information on the outside of the box, usually “49MHz” or “27MHz” or channel numbers.
To give GISMO 4 a high-tech look, apply a coat of silver paint, attach an antenna and stick an old circuit board under the clear dome for an electronic “brain.” Or go for the sumo look: a cloth tied on bottom and a cool pair of sunglasses on its head, under a topknot of hair.
GISMO’S PARTS
- Chassis from a radio-controlled truck.
- Large plastic planter, wastebasket, or 1.5-bushel laundry basket.
- Plastic storage container.
- Plastic foam “noodle.”
- One piece of 1-by-2-inch lumber
- Screws
- Epoxy glue
- Tape
- Long nylon wire ties
- Sandpaper
- Nuts, bolts, and flat washers.
- Tools Needed: Saw, screwdriver, pliers, drill or awl, scissors.
 STEP 1: Test drive the radio-controlled truck before you remove the chassis. Stores may not honor the warranty afterward.
 STEP 2: Turn the truck over and remove the screws that hold the truck body to the chassis. Carefully lift the body off, pulling the antenna wire through the hole. Leave the front bumper/winch assembly on the front to provide extra stability for front-end bumping. Save the body parts and screws.
 STEP 3: Center the 1-by-2-inch wood block and chassis, wheels up, on the plastic tub. Slide the chassis forward so the front bumper touches the tub. Mark and cut the block so it fits snugly inside—trim or sand the corners for a tighter fit. Glue the block to the flat part in the center of the chassis, above the motor battery compartment. Don’t let glue get on the other parts of the chassis. Check the fit inside the plastic body and set aside to dry.
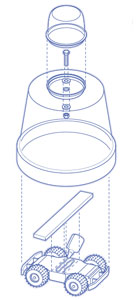 STEP 4: Center the food storage container’s lid on the bottom of the plastic tub. Use an awl or drill to make a hole through both. Attach the lid with a nut, bolt and two flat washers.
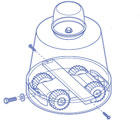 STEP 5: Use an awl or drill to make a hole to attach the tub to the front bumper of the truck chassis. Secure with a bolt, nut and two flat washers. Mount the robot’s plastic body to the chassis’s wooden block with small wood screws. Make sure there is enough clearance for the wheels to turn and move freely. Tape the antenna wire to the inside of the body.
 STEP 6: Add the foam noodle around the opening of the robot’s body to act as a bumper. Trim the noodle to fit, then use an awl or drill to make holes at the back and front as shown in the diagram. Attach the noodle to the body using nylon wire ties.
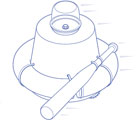 STEP 7: Paint or add accessories to the robot’s body if you want. We added an arm to GISMO (we used a plastic baseball bat). Now he’ll look more like the BattleBots of TV fame. Use an awl or drill to make holes through the body where you want to mount the arm. Use nylon wire ties to attach.
GISMO 4 is now complete. Add other accessories to your not-so-lean bumping machine and enjoy some ’bot bouts with your friends.
I just read about it and i defenitaly want to try it!
P.S. I can’t beleve jinbob said flamethroer
this is a great idea. i’m trying this as soon as i get the money.
maybe i’ll show my friends how to do this and we can set up an areana.
I love gizmo he is crazy!!!!! yaaaa!!! yhoooo!!!!!!!!!!!!!1
i will start a collection of these robos and sell kits for $9.99.wanna buy 1 or 2?!?!?!?!?!
i wuold like to do this, but i cant afford it. stupid money problems..
this looks like a good weekend poject
flamethrower
i recycle bottles. once i get the money, I’M MAKIN IT!!!!!!!!!!!!!!!!!!!!!!
i was on battle bots the show i was the champ then grant imahara (mythbusters helper)came and defeated me
how dare he
What? you want a kit? show your creative genius by building your own!